Andrea's blog
Nursery Wall Canvases
I spent this weekend painting, cutting, gluing and piecing...to make these for the new baby boy's nursery:
which were shamelessly "inspired" and lifted by these prints from Babies R Us:
I used 16" x 20" canvases, scraps of various patterned papers and just went to town paper piecing them all together. Since I had pictures to work from, I was able to free-hand the various shapes pretty well. Once all the animals were put together, I used my sewing machine to stitch a border around the outline of each animal. Then I painted the backgrounds of the canvases and taped off borders to make the brown border around each canvas. Finally, I used mod-podge to put them all together and protect them.
Here are close-ups of each:
This was a fun project and I love the textured finish...much better than buying prints I think....but thenit did take two full days of work to finish them!
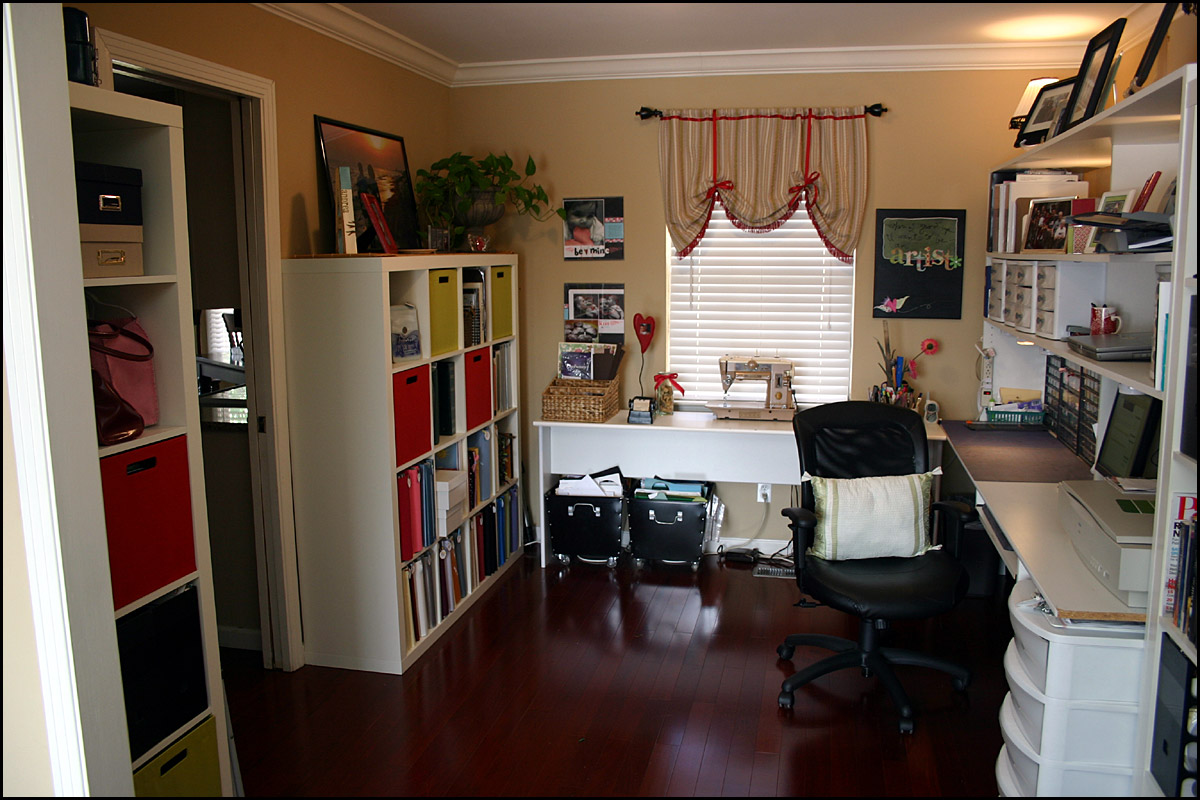
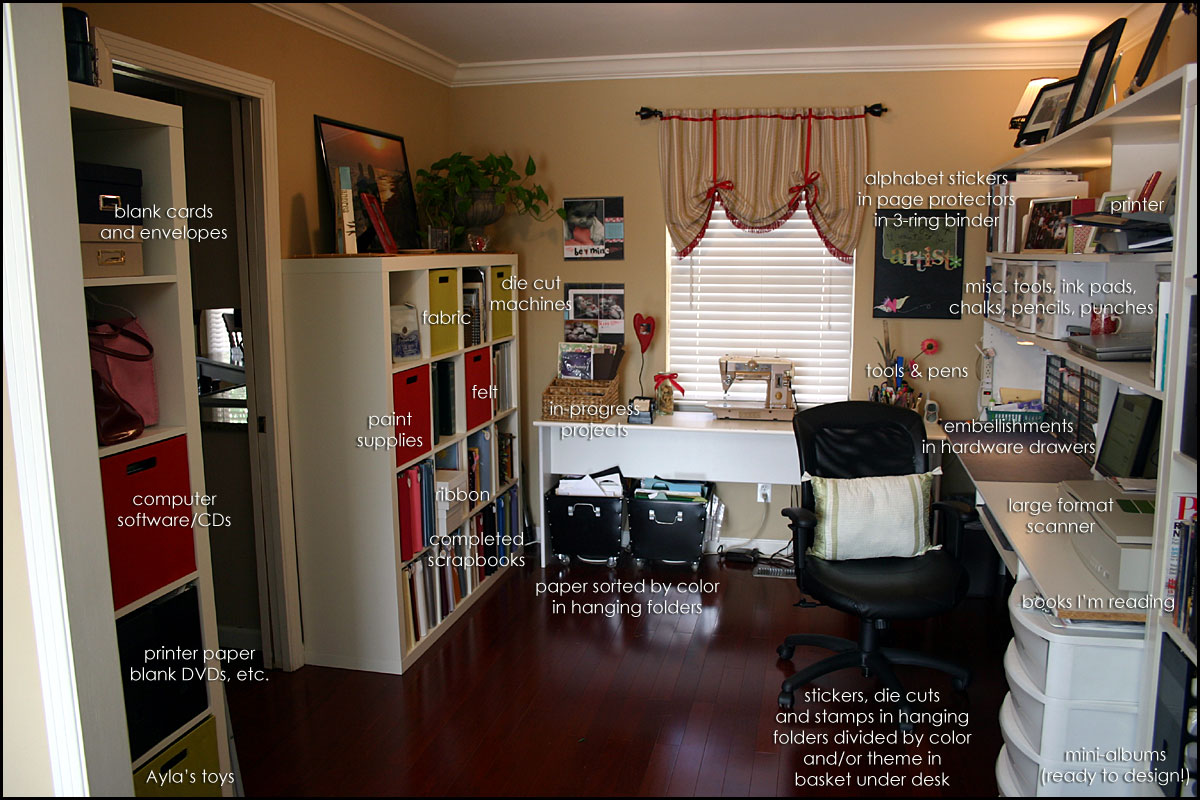
Scrap Room Video Tour
I've been reorganizing some things in my office the last few days, bought some fabric drawers to hide some clutter, finished some decorating stuff, and it finally looks more like what I had in mind when I first got my Expedit shelves from IKEA. It had been getting more and more cluttered with junk over the past few months and needed some rearranging!
Now that's it's cleaned up and looks a little nicer, I thought it would be a good time to do a video tour and show what my office looks like, where I store things, and give you a look around:
(click photo for larger version)
Or...you can click here for a labeled image telling where I store different things.
And, if you're REALLY interested in taking a look around, here's the link to an 11 minute video tour of all the goods:
Andrea's Scrap Room Video Tour
Enjoy! I definitely do. It's been a great place to work and create, right in the middle of our house, where I can still be involved with everything else that's going on....
Sewing Saturday
Ben was out of town Friday & Saturday for a wedding in Austin, TX, so I took the opportunity to do a few decorating projects around the house. I've had the decorating itch ever since we took down all the Christmas decorations. Inspired by my sister-in-law Rachel, I decided to try out my new sewing machine (new-to-me anyway) and tackle a couple of sewing projects.
I headed out to Hancock Fabrics in search of some fabric to create a curtain in my office and was pleasantly surprised with some great sales (decorator fabric at only $3.50 a yard!). Although I was looking for a cream/green swirl design, I came across this fabric that had all of the colors from my office in one pattern: tan, red, green and turquoise. So I decided this was the way to go. I also picked up some red fringe trim and red ribbon to accent the curtain panel.
I originally wanted to make a curved panel that was longer on each side, but decided that anything curved was a little too ambitious for my novice sewing talents. So instead, I decided to make a single panel and create a roman shade with ribbon gathering up the two sides. It took me a while to get it finished, but I'm awfully proud of my new curtain. :) Any finished sewing project that doesn't result in tears is a success in my book:
And, since the sales were so good, when I saw this blue and cream fabric, I decided it was time to recover a couple of pillows in our livingroom as well. I wish I had another use for that fabric, because it was so pretty...but I settled for just a yard and a half to make two pillow covers.
My third sewing project of the day...recovering an old comforter with a homemade duvet cover made from two twin sheets for Ayla's new bed. I don't have a photo of it...but it's just a brown comforter...not too exciting. :) But, it was only an $8.00 comforter, which I think is pretty cool!
I might just have to add a few more sewing projects to my to-do craft list. I seem to be getting the hang of it....as long as you don't look TOO closely!
Cardboard Oven
With all the kitchen utensils, pots and pans that Ayla got for Christmas, I decided to go ahead and move all her kitchen-related toys to the kitchen on a trial-basis. I hesitate to keep them there mostly because I can't stand the thought of her toys scattered throughout the kitchen. But...so far she's kept them pretty cleaned up, and it has really helped with keeping her busy while we're cooking meals or cleaning up in the kitchen.
She kept asking where the oven was though (her sink/dishwasher and stove didn't suffice), so I decided it was time to make her an open & close oven.
Bring out the cardboard boxes...
This was a fun-looking box we had some pizzas shipped to us in from Lou Malnati's, and it made a great base for the oven. I cut a door and window into the front of it (used a cut page protector to create the window). I also added another cardboard box to the top of it to give it some height, covered it with cardstock and drew on the burners, knobs and a clock...the finishing touch was adding Ayla's favorite time -- 6:30.
A Good Review...
Critics are tough, so I've been interested to see what the reviews are for my e-book that just came out at Scrapbook.com. The first review is good, so that "makes me happy" as Ayla would say. Maybe I should stop reading the reviews there and just assume that if one person loves it, then everyone will!
In case you're interested, here's the link to the book:
A Scrapbooker's Quick Guide - 365 Special Days by Andrea Steed ($3.99)
Top 10 Layouts of 2008
I saw this idea on Amy Tangerine's blog today, and thought it would be a good exercise for the end of the year as I'm trying to finish up my 2008 family album.
Although my 2008 album isn't finished yet (still working on September-December layouts...) I figured I could surely find 10 of my favorites to share...so here goes (in no particular order):
I'd say if nothing else, I'm consistent. I like LOTS of photos on every page! :)
If you're a scrapbooker and have a blog...I challenge you to do the same! Pick your favorite 10 from 2008 (even if you just MADE them in 2008, regardless of when the photos are from) and show them off!
Fingerprinted Notepads
For all of Ayla's grandparents gifts this Christmas/Hanukah, we made a handmade (literally) project that was very easy to do and turned out to be a great afternoon activity for me and Ayla to do together.
We used Ayla's fingerprints and stamping ink to design three flowers. Then I went back with a pen and outlined the fingerprints to define the flowers a little better and signed her name.
Next, I scanned each of the flowers and created a Word document for each design that could be cut into 4 to make little notepad pages.
I printed about 25 copies of each flower (making 100 pages of each design). Next, I cut the printed pages into the individual pages (which ended up being 4 1/4" x 5 1/2"). With all the designs printed and cut, I assembled 7 booklets (one for each set of grandparents and great-grandparents), alternating red, blue and pink flower designs. The final booklets had about 40 pages each.
To make the notepad more sturdy, I cut pieces of cardboard to 4 1/4" x 6 1/2" and scored and folded the top edge at 1/2" and 3/4" to create a little cardboard flap to fold around the stack of pages and cover the entire back of the notepad.
I used a stapler to staple the pages together and then hot-glued the pad inside the cardboard flap, but I think a heavy-duty stapler through the cardboard AND the papers would have been a better choice...I just didn't have a heavy-duty stapler to use at the time!
Next, I added a thin yellow bow around the top edge, glued a piece of patterned paper to the back, added few magnets and finally a little "made by" square, including another fingerprinted heart by Ayla.
Great handmade, easy project!
Signs, Signs, Everywhere are Signs
Now that the gifts are all unwrapped, I can share a few of the homemade creations that I worked on this year. First...signs. Last year, I made this sign for our friends Winn & Betsy in Minnesota. It was so fun to do, that I knew I wanted to make a few for Christmas gifts this year.
Since I drew my sister-in-law Rachel in our Steed family grab bag....and she and I are *always* talking about decorating ideas, I knew she'd be a good candidate...so she got a "Steed" sign. It's made on an old piece of wood that is about 1" deep, 5" or 6" tall, and about 2ft wide (roughly). It has sawtooth hangers on the back so it can be hung on a wall. Ben really liked this one, so I might need to make one for us too!
My friend Alison and her family are building a new house, so I thought they might enjoy something decorative to put in it...so they got a "Mickelson" sign. This one was made on a 2" x 4" that is about 18" or so long, so it'll sit well on a shelf or mantle. I wonder what they thought about me mailing them a 2" x 4". Hmm....
And lastly, I made my mom a vertical sign that she can put out in her garden. It's about 4" wide, 1" deep and 3ft tall.
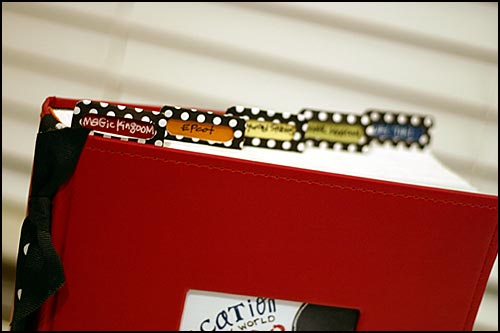
Disney 2-up Photo Album Scrapbook - Completed!
 Put me on a mission, and I'll get it done. Tonight I finished up my Disney scrapbook from our September trip. Mind you, I didn't do anything fancy. It's a simple 2-up photo album and I just made a few embellishment / accent cards to include in addition to the photos.
Here are some peeks at the inside...handwritten journaling, a few character stickers, and minimal embellishments. (I saved the "art" for the cover and title pages for each park, which I shared here a while back.)
But..in addition to completing the journaling and embellishment cards, I did add a couple of little tricks that I thought were worth sharing.
First, I added tabs to each section to divide the album by theme park.
Then, just after the title page, I left two pages for some journaling and a schedule of what we did each day. When I finally got ready to make that page, I decided to make little flaps (2" x 12", folded in half) to hold the journaling for each section. I love how it turned out and that it's kind of an interactive Table of Contents:
Ahh, feels good to finish an album. Here's the last page, and since the album comes with a CD holder, I included a DVD-ROM of all of the photos and videos that we took on the trip:
And now, I can cross this album off my list, and move on to my next two scrapbooking projects: my Grandmother's Memoirs and a Baby Boy Album! :)
Disney Layout - A week of fun on one page
Yesterday I tried catching up on some scrapbooking, and finished off this Disney World layout.
I am making an entire album of the trip with lots of journaling, etc, so this is just the 2-pager that will go in our 2008 album. I used another Snapfish Collage Print (remember those?) to get all the little thumbnail-sized pictures and then cut it all up.
I love how the giant Mickey head turned out. Originally the left ear was going to be black and I had an 8 x 10 photo, but the photo kept covering up too much of the background and taking over the layout. So I ended up just making that photo one of the ears. Then I stitched around the whole Mickey head with red thread (thanks to the new sewing machine my mom gave me at Thanksgiving).
The other focal photo (the castle reflection) was one of my favorites of the whole trip, so I used my white Sharpie paint pen to create a polka-dot border to highlight it a little more.
Finishing touches include the title (in alpha stickers by Making Memories and Doodlebug), fireworks stickers (because who doesn't love the Disney fireworks?) and journaling strips printed on red cardstock.
Now if I can just get that Disney album finished up...my queue of projects seems to be growing and I hate starting new things without old projects completed....maybe today I'll work on that....
