Andrea's blog
Reunited with Edison
Ben published an article today for Heartlight.org, called "Reunited." He tells the goose-bump giving story of how our family was reunited two years later with Edison, the sweet little boy whose house he visited in Ecuador. Read it.

Compassion International is an amazing program -- and it's working! We can see it in the round little face of this boy who was so ill when Ben first met him, but through the work of the Child Survivor Program, and now the Child Sponsorship program, his is thriving and doing well!

It's Valentine's Day. What better day is there to dedicate your love to someone who needs it? Consider sponsoring a child through Compassion International.
Places We've Lived Scrap Wood Frame
While Ben was out of town for a few days and the kids were both sick and watching movies, I started itching to do a small project. I settled on this scrap wood framed print of our personalized "Places We've Lived" subway art. (It's easy to make your own! Just use the Subway style and add your "locations" with my Custom Family Rules Builder).

It was pretty easy to do, and only took about 10 minutes - truly.
I had already ordered the 8" x 10" poster print through my Zazzle store a while back (though you can also get an instant personalized downloadable version for only $9, and print it at home on cardstock or photo paper). It features all the important places in our lives together -- which started almost 18 years ago!

I had recenly collected a bunch of 4" scrap wood that had some really cool color and grain, so I rough-cut a few boards down to size - three 18" boards for the back, and two 12" boards for the front. They aren't perfect, but that's kind of the point. :)
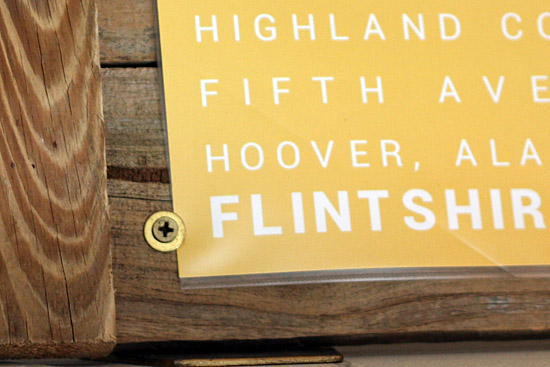
I used some brass screws that we had at our workbench in the garage to attach the front two vertical boards to the three back horizontal boards, and then used more brass screws and washers to wedge a page protector (trimmed down to 8" x 10") onto the front of the board. An 8" x 10" piece of plastic would work well too, but I didn't have any on-hand, and the page protector covers both the front and the back of the print, which seemed like a good idea.
Since the wood was pretty soft, I didn't have to pre-drill, but if it had been harder wood, I'd recommend pre-drilling.
That's it. Then I just propped it up in the corner of our bookshelf and admired it. (Then I probably had to go clean up some vomit...the kids were sick, remember?)

I've been looking to find something substantial in size to put at the top corner of my living room bookshelves that wasn't a vase or a photograph (I have plenty of those!). So, this "Places We've Lived" print and some natural wood seemed like a good choice, since I've started using a golden yellow as one of the accent colors in our livingroom, that I've been slowly working on redecorating.

Now if I could just find a coffee table that we both like...
Little Tricks for Little Fingers
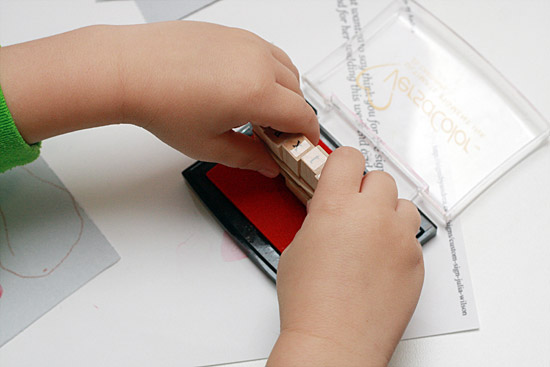
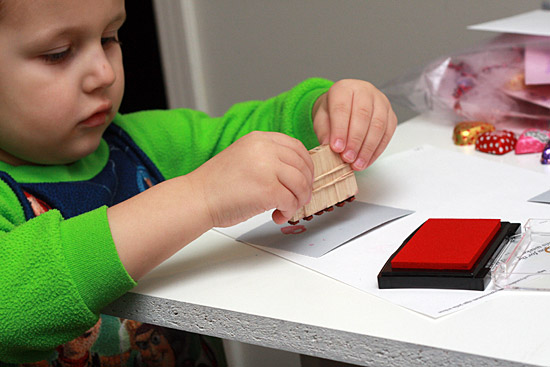
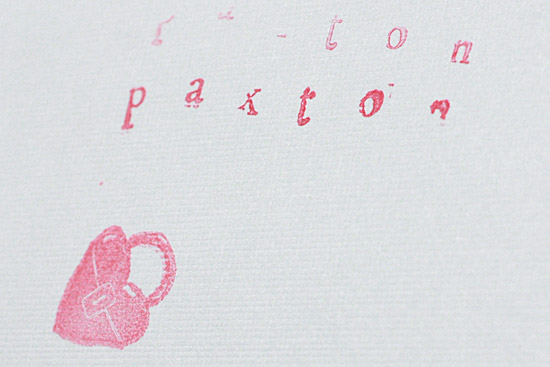
When you're little and it's hard for you to write your letters and you get *so frustrated* when they just don't come out right (especially when you have to write a "P" on a whole class worth of Valentine cards), crafty little tricks can come in handy.
I saw this genious idea on Pinterest the other day, and knew it would be a good way for Paxton to be involved in his Valentines, without making it too hard (and frustrating) for him.
Just combine small wood alphabet stamps together to spell out the word (in our case it was "Paxton") and put a rubberband around them. That keeps them together and turns the word into a single stamp.

{source: The Frugal Crafter}
Easy enough for an *almost* four year old...Now that's easy!
Compassion International - Colombia
Last week Ben went on a trip with Compassion International to Colombia with a group of Compassion supporters to check out the work they are doing with the kids in Colombia.

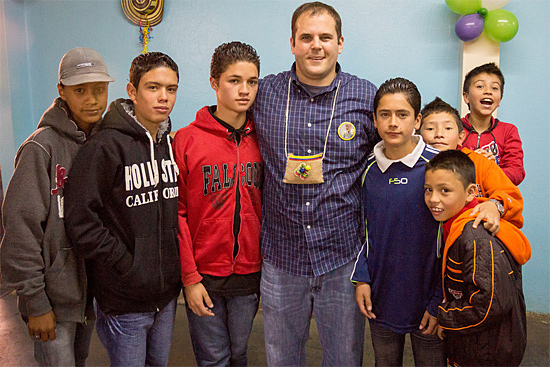
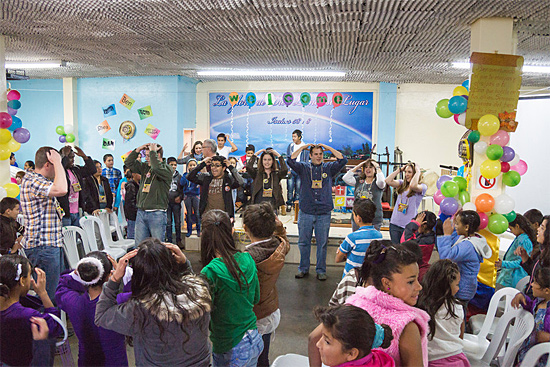
Today, he published an article on Heartlight.org - Compassion in Colombia - that tells a little bit about his experiences, as well as the inspiring story of Jailer - his translator on the trip, who has been a product of Compassion's efforts in Colombia.

Two years ago, Ben went on a similar trip to Ecuador that inspired our family to sponsor a little girl Ayla's age. Her name is Mercedes. Then, when Paxton was old enough to have an Ecuadorian buddy, we also began sponsoring a litte boy his age - Edison Ivan. Through their letters and photos they've become a part of our family, and we pray that through our support and the help of Compassion International and the church in their country that they have success stories as inspiring as Jailer's!

*Most of these fantastic photos are credited to Dan Pritchett - one of the people who accompanied Ben on this trip to Colombia. His album of photos brings the trip to life!
Other trip companions took great photos too - MeLissa Houdmann has several folders on her Facebook page in a day-by-day account of the trip.
Entryway Before & After
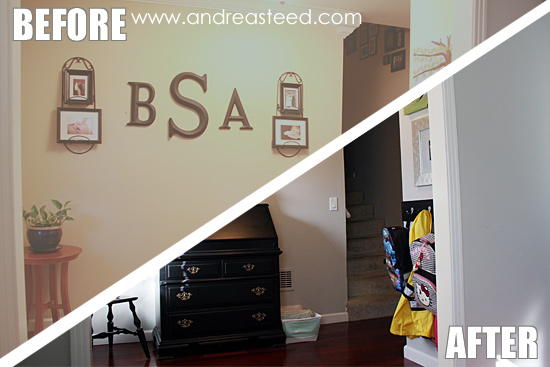
We repainted several rooms in our house WAY back in October, but things got kinda crazy in November and December around here, so the "redecorating" had to take a back seat. We're still lacking several things, but since it doesn't look like things will be "FINISHED" for a while...so I thought I'd post a few photo updates of the other rooms we painted.
I've already shared the Kitchen and Dining Room and my office before and afters. Now, let's look at the entryway.
Here it was BEFORE:
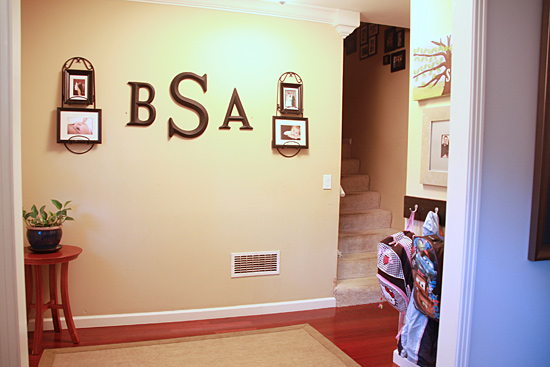
What you can't see in this picture is how dirty those walls are, and how many giant holes there are up there on the wall (next to the B & A).
We painted the walls and ceiling the same color as my office (Sherwin Williams Worldly Gray 7043), repaired all the walls, and cleaned all the baseboards. Amazing what a little elbow grease can fix!
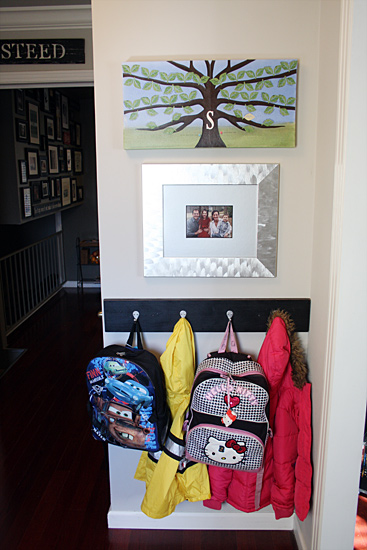
When we started putting everything back, I decided to take down the plate holders with frames in them and retire 'em. They've been around a long long time. :) Instead, we put back our monogram, family tree canvas, and brought in the secretary desk that I'd had refinished not too long ago.
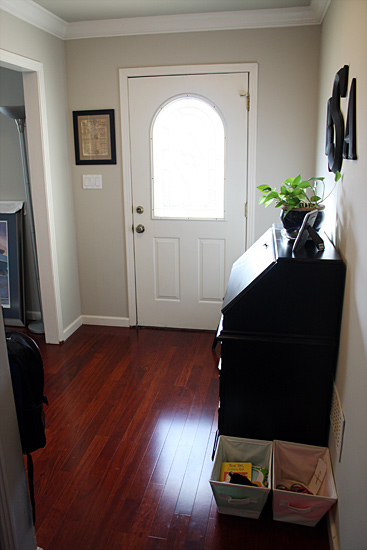
AFTER:
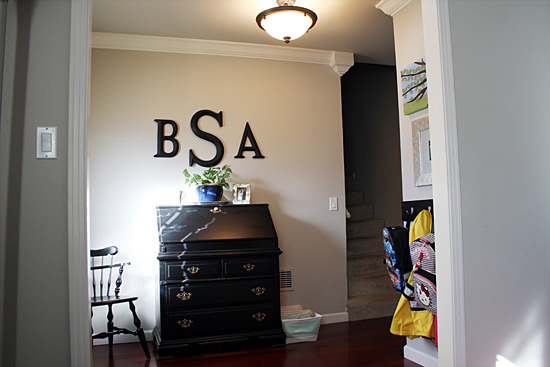
Here's a view from the stairway, looking toward the front door.
BEFORE:
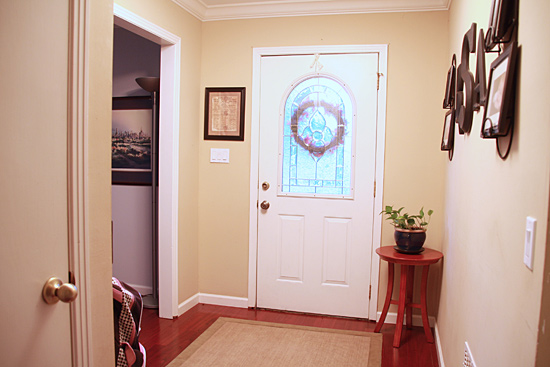
and AFTER:
The framed print by the door is the original building permit for our house. We found it in the garage after we moved here, and thought it was pretty neat looking. The entryway just seems like the right place for it to stay!
I'm still shopping for the right rug for this space, but haven't come across the right thing quite yet...
The two buckets next to the desk aren't exactly a "decorating" choice, but they have been VERY functional - so they're staying! These are the kids' junk buckets. Anytime we find something of theirs laying in the living room, kitchen, stairway, or my office, it goes in the bucket. At the end of the day, they carry their buckets upstairs and put everything away before bedtime.
We've been doing this a few weeks now and it's worked PERFECTLY. The kids are glad they don't have to put their stuff away immediately. We're happy there's not junk all over the "adult" areas of the house (especially the kitchen island), and they've been happy to put it all away when it's time to do it.
Speaking of functional spaces...the entryway is also our school bag and homework central area. We kept the little board with coat hooks just like it was before. Four hooks - two for coats and two for backpacks - for two little kids. :)
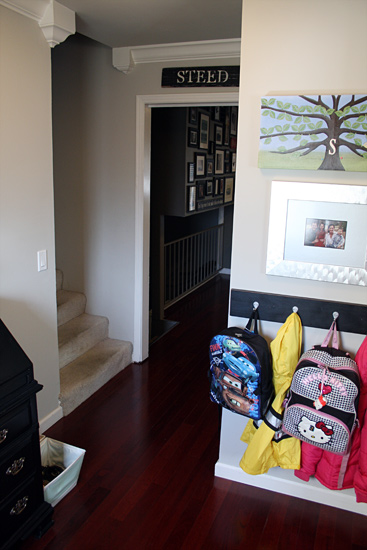
When the kids get home from school everyday, they unload their lunch bags and backpacks and hang them and their coats up here.
Then, I sort all the papers that come home at this desk, and Ayla does her homework at it - we just open the desk up and scoot the chair over for her). This has helped keep papers and books and "stuff" from cluttering up the kitchen island or my desk and then Ayla has a dedicated space to do her homework.
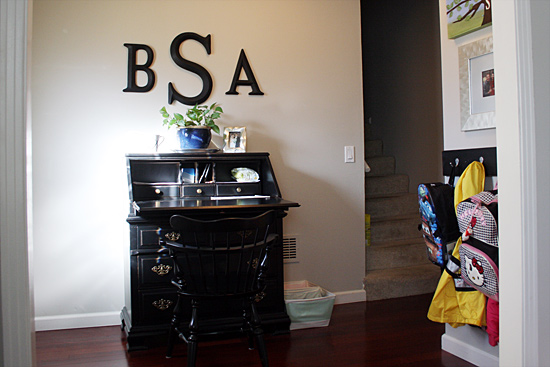
The top dresser drawer of the desk holds folders for each kid, with all the schoolwork we are saving throughout the year. We also keep the little photo albums that hold all our postcards from Noni, as well as any coupons or flyers that we need to hold onto in the top drawers of the desk.
So that's it. Entry way is mostly done. :) And it's turned into a functional space, instead of just being a walkway. Yay.

Girl Scout Cookies for Sale!
So...I *know* Troop Beverly Hills didn't sell "real" Girl Scout cookies (they were Wilderness Girls), but who can sell Girl Scout cookies without thinking about this awesome scene from the movie??
Let the cookie selling commence! Ayla is now taking orders (via me) for any of the 8 fabulous flavors of Girl Scout Cookies.
- Thin Mints
- Caramel deLites / Samoas
- Peanut Butter Patties / Tagalongs
- Trefoils / Shortbreads
- Do-si-dos / Peanut Butter Sandwich
- Savannah Smiles
- Dulce de Leche
- Thank U Berry Much
Boxes are $3.50 each and we'll have boxes in-hand as soon as Monday (no waiting this year!) Checks can be made out to "Andrea Steed".
Place your orders here in the comments section or email me at mrs@bensteed.com. She (and her troop) will be very grateful for your order!

Buy One, Get One Free Signs By Andrea Sale! Ends Monday!
I am offering my biggest and best SignsByAndrea sale of the entire year. Seriously. This sale is SO BIG, it only happens once a year! And it's almost over!

All of my standard personalized signs are BUY ONE, GET ONE FREE!* through Cyber Monday (11/26/12). There is no limit on how many you can purchase, so go ahead and pick out personalized hand-crafted signs for all the people on your shopping list! Just add each personalized sign to your cart, and the discounts will be automatically applied -- no coupon code needed!

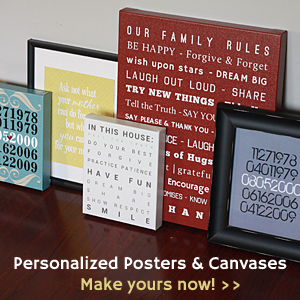
*For each painted wood sign you purchase, you will receive one equal or lesser-valued sign for free. Custom wood signs are not included in this sale and will be quoted and priced separately. Gift Certificates, (de)Signs posters and canvases and digital downloads are also excluded from this sale.
ScanMyPhotos.com Review
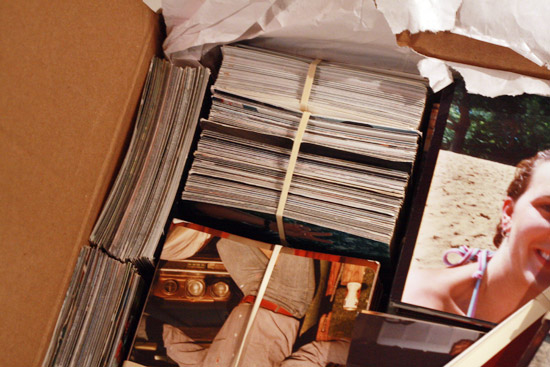
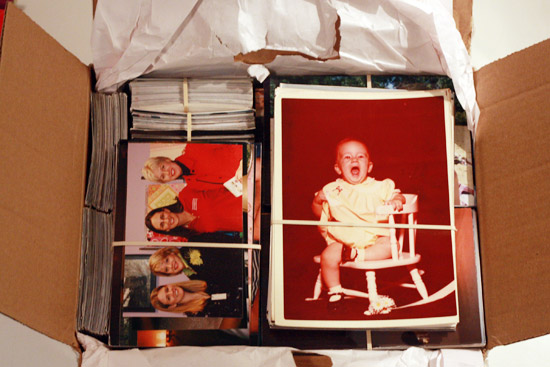
On New Year's Eve last year, Ben and I made a future-friendly and space saving purchase. We bought three boxes worth of photo scanning from ScanMyPhotos.com. We took advantage of a great sale and got one box free, but it was still a good chunk of change at $368.00. Merry Christmas to us! However, when you consider that fact that we crammed 2,255 original photos spanning about 34 years of memories into just one box, and now they're all preserved digitally and backed up in several places -- I think we got a steal!
What We Ordered:
We bought the "Prepaid Photo Scanning Box" at 300dpi. We could have upgraded to 600dpi if we thought we'd do much enlarging or printing, but mainly, we just wanted to have digitally viewable copies of the pictures for browsing on our computers, tablets, phones, etc., adding them to blog posts, emailing, and so on. So, 300dpi seemed like a sufficient choice. Plus, we can still reprint them at their original size with no problem, and even the 3.5" x 5" photos can be enlarged to 5" x7".
Buying a pre-paid box means that you get to cram as many photos as you want into a flat rate box. That's a LOT of photos. Like I said...we fit 2,255 pictures (mostly 3.5" x 5", 4" x 6", and 5" x 7") into our first box. And we still have two empty boxes to fill!
We did not add any additional upgrades (like photo restoration). We can do that on our end if necessary with PhotoShop or on a photo-by-photo basis.
Preparing Your Photos:
It's not an easy feat to get photos ready to scan. Well, that's not true. It's easy, just time consuming.
Paxton's closet is full of about 20 photo boxes and large plastic bins full of pictures, many of them ours, most of them my mom's, but that includes my childhood, so I claim most of those boxes!
For this first ScanMyPhotos box, we focused on including photos from each of our childhood's through our married life (pre-digital camera).
We'll probably fill one of the other boxes with photos from Ben's parent's house to get more of his and his brothers' childhood and family ancestry, and I'll probably fill the third box with more photos from my mom's photo boxes that include more pictures of Jake's childhood and Mom's activities (since I skipped over those for my first round that was -- All.About.Me.)
We took about 2 weeks and spent the evenings in front of the tv (actally, one of those weeks was when I was doing a No Media fast, which gave me lots of free time to work on it!) to go through photos.
We tossed duplicates, blurry photos, and totally irrelevant pictures. That was hard. I can throw away just about anything, but throwing away pictures was hard. We did it though! And narrowed it down to 2,255 pictures.
My photos came mostly from my mom's photo boxes. It was kind of painful to pull them all out of the nice and neat and organized boxes that had been so carefully labeled with dates, locations and names. We had to sort them by photo size, not content when we got them ready to pack into the box. So they ended up all mixed up. Ouch. That was hard. Will I put them back where they came from? I dunno. Maybe. Maybe not. Either way, I know we've reduced the number of photo boxes in that closet by about half, just by throwing away duplicate prints.
The good news is, most people don't have that nice and neat and organized system - so it's just a matter of collecting photos from all over and putting them into like-sizes, and then packing them into the box - like this:
Shipping:
Then you ship them away -- another completely stressful element of the process. You pack your entire history away into a box, tape it up as best you can and then just pray and hope that they arrive at their destination safely. All this stress and work is in the name of preserving the memories, but if something happened to this box...they'd be gone forever...
I literally almost threw up when I dropped the box into the post office package drop.
I recommend getting insurance and tracking on your package. I forgot to and had a near panic attack when I realized it. Thankfully, the online chat support at ScanMyPhotos was able to confirm that they did in fact receive my package (their confirmation email sent that same day was caught by my spam filter), and my photos were safe and ready to be processed.
Whew. My nervous breakdown was avoided.
Then you wait. It takes about 4-6 weeks for them to scan all the photos and ship them back to you.
The Finished Product:
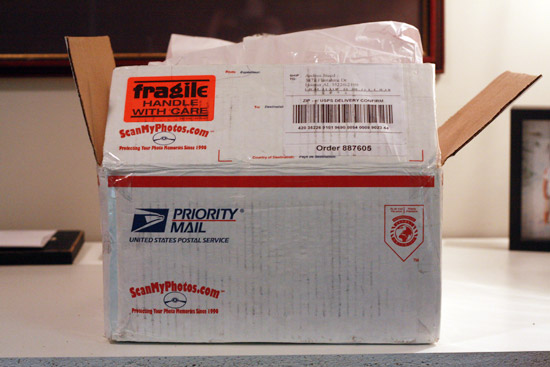
Several weeks later, I received an email letting me know when they shipped the box back to me via USPS Priority Mail (with a tracking number). It wasn't nearly as stressful to have it shipped back to me, because I know that they keep a backup of all the digital files for a while. So if the box disappeared...at least the digital files could be recovered at this point.
Here it is:
And here's what all that work resulted in...a DVD full of ALL those photos! I immediately put the images onto our external hard drive (which is backed up nightly via Carbonite), and now I can rest easy, knowing that all those images are safe and accessible!

One of these days I'll probably sort through the images and put them into chronological order in labeled folders on my computer, so they'll be easy to find.
Cool, huh? Wanna see some of the photos?


I mean...this stuff should not be forgotten. It's good stuff. And now it can live on forever!
Bite the bullet. Do it. Have your photos scanned. I'm going to spend this weekend putting together another box full of 'em. It's so worth it!
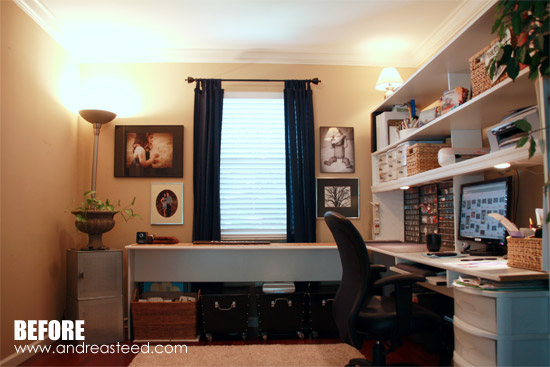
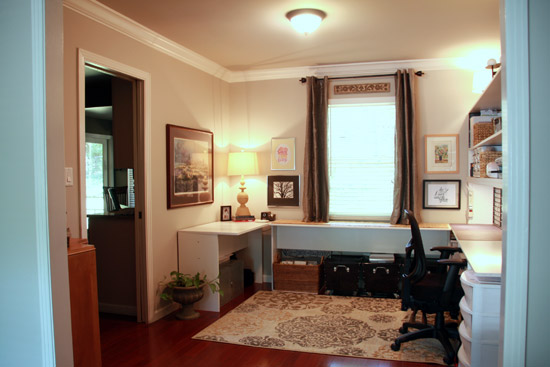
My Office Before & After
 As part of our painting marathon a couple of weeks ago, my office got a new coat of paint - on both the walls and the ceiling.
While I would have loved some turquoise walls, I decided that it was probably better for our house as a whole to go with the same color we had chosen for the livingroom (which is attached to my office) and the rest of the house. - Sherwin Williams Worldly Gray 7043. We painted both the walls and ceiling the same color - and remarkably, only needed one coat of paint to cover it (we used the Sherwin Williams Cashmere paint and were very happy with it).
Along with covering over lots of scratches, dirt and a WHOLE bunch of holes in the walls, I took the opportunity to give my office a little sophistication upgrade as well.
Before:
It used to be crafty and crowded (here's a before picture from a few years ago):

When I started feeling claustrophobic, I removed several things from the room, including that giant shelf on the left, that was relocated to Paxton's bedroom to store toys. But then my office was just kind of yellow-ish and boring as you can see here (photo taken a few weeks ago):
After:
So here it is now, after a little more thought and attention to detail (probably too much if you ask Ben...I tend to get obsessive).
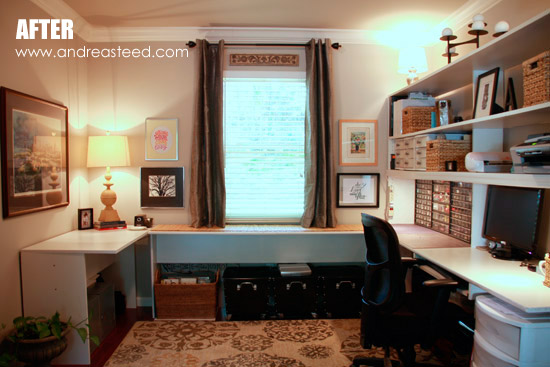
While there may still be a few tweaks to make along the way, I'm very happy with my slightly more sophisticated office. It flows much better now from the kitchen and livingroom on either side of it.
Subconsiously, I think I used this office as inspiration and stuck with very neutral shades of gray, tan, and brown, with a touch of color, found mostly in the artwork.
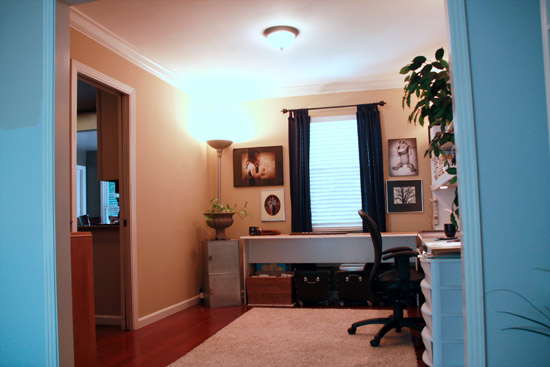
Here's a view from the living room (which is painted in the same color).
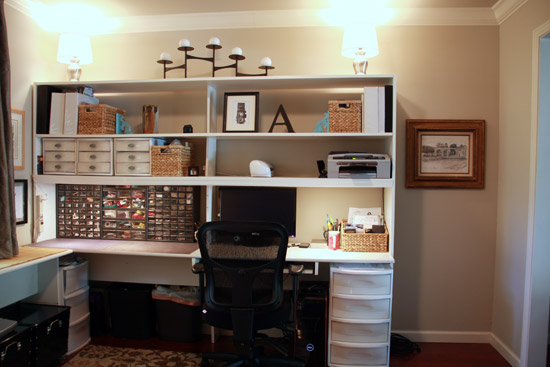
What's New?
I replaced the lampshades on lamps on top of my desk with round white shades instead of the old-style pleated shades that were on there before. I'm considering adding some trim or covering them with fabric to add some color...but haven't settled on that quite yet.
I also bought a new office chair (Temur-Pedic TP8000), which while it isn't exactly winning any style awards, is very comfortable, and that wins out when I sit in it ALL the time! My old chair was giving me all sorts of hip problems -- and I'm too young for that.
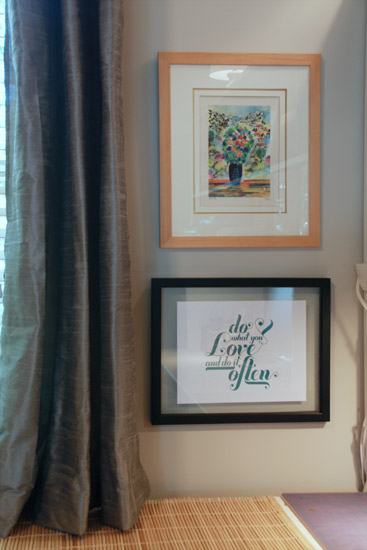
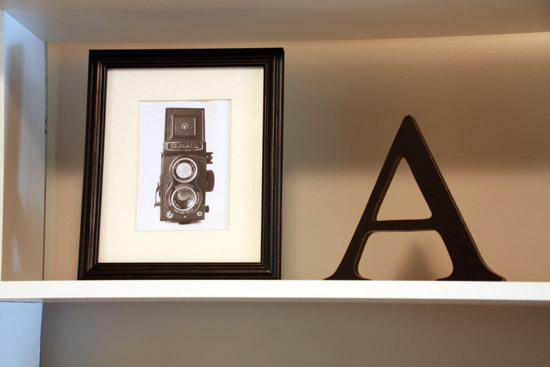
I really wanted the artwork in my office to be inspiring and meaningful -- and made by other artists...not by me. My old office was a little too self-indulgent I think, full of my own projects and artwork. It's time to appreciate the talent of others! Here's some info about some of the artwork I chose:
- A pen drawing of a statue and aquaduct called Fuente de las Tarascas that I bought in Morelia, Michoachan, Mexico the summer I studied there. (hanging to the right of my desk in the gold frame)
- A watercolor print "Flowers in Vase" from an Israeli artist called Victor Shrem (a wedding gift from my aunt & uncle)
- Do What You Love and Do it Often Printable from How Joyful (FREE)
- Vintage Camera Printable by Design Editor (FREE)
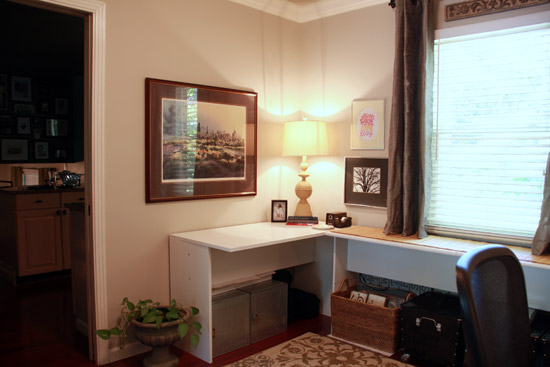
Left Corner:
Here's a look at the left corner of the office BEFORE:
And AFTER:
I bought, hung & hemmed (in that order) new curtains from World Market (Silver Dupioni Grommet Curtain). Don't look at the back of them. It ain't pretty. Seriously. But from the front...it'll do. A little tip - I hemmed these faux silk curtains by hand, while they were hanging on the pole. That way I knew they'd rest just above the top of my desk. Measuring isn't my strong suit and sewing faux silk was WAY too intimidating to attack with my sewing machine. I hung the curtains right below the crown molding instead of just above the window to help make the room look taller, and to match the height of the new curtains I bought for the living room.
I built a third section to my desk to give myself some table space on the blank wall behind me. (Actually, I built about 75% of it. Ben finished it off after I messed it up and abandoned it to make dinner instead one night. He saves the day often on stuff like that - he's so much more precise than me!)
More Artwork Info:
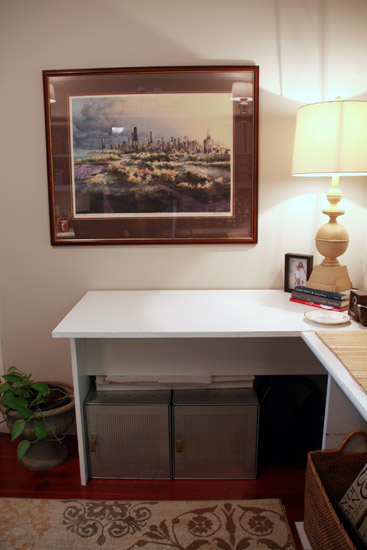
- The large painting on the left is a watercolor print called "Autumn Sunset" of Chicago, painted by a family friend, Tom Lynch.
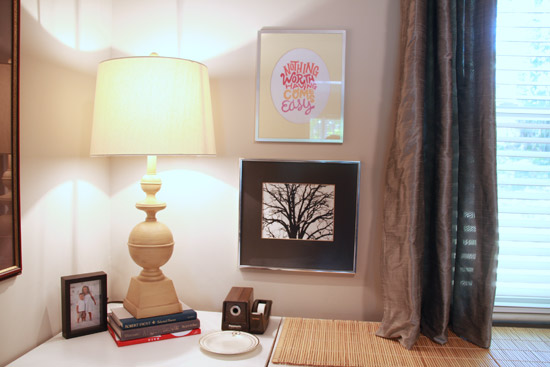
- "Nothing Worth Having Comes Easy" printed from internet - I can't find the original source... :(
- The black and white photograph of the bare tree was taken by my mom. I'm not sure where or when? I'll have to ask her. She had this frame & photo up in her old house on a gallery wall, and I inherited it when she downsized to a camper (she's a rambler now!)
I bought that new table lamp for the corner at Home Goods. I'm still thinking I might paint it a dark turquoise, but for now, I like the yellow.
The Rug:
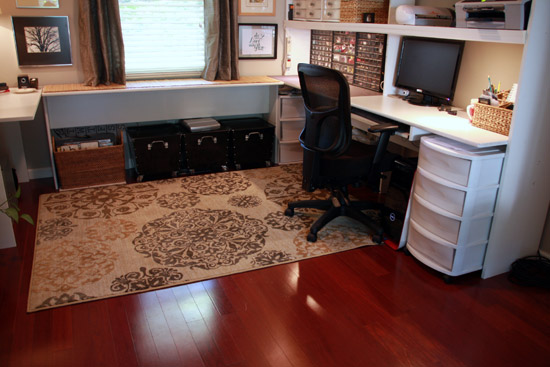
This rug took me FOREVER to decide on. I was pretty much obsessed with rug and curtain shopping both online and locally until I settled on this one from Target.com - Mohawk Medallion Rug. I had already bought and returned another rug, so I wasn't willing to order online unless I could easily return it locally. So I stuck with stores like Target. :) I like how it has a pattern, but isn't completely overwhelming and busy. Plus, the dark gray medallions tie in the couch from the livingroom (so do the curtains) and the light colored medallions bring out the gold in my storage baskets.
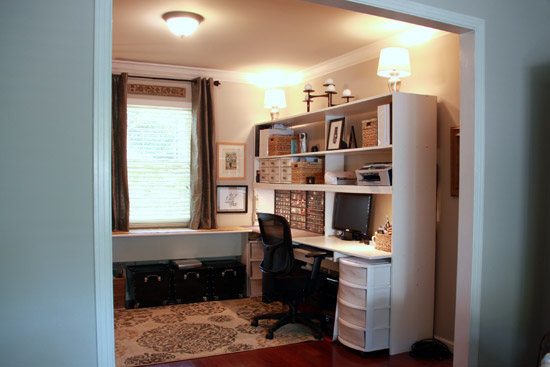
The "Hallway" Corner:
Finally, here's the last corner of the room, which may still need a little work. You can see how the room connects to both the livingroom (on the left) and kitchen on the right. It was originally supposed to be a formal dining room.
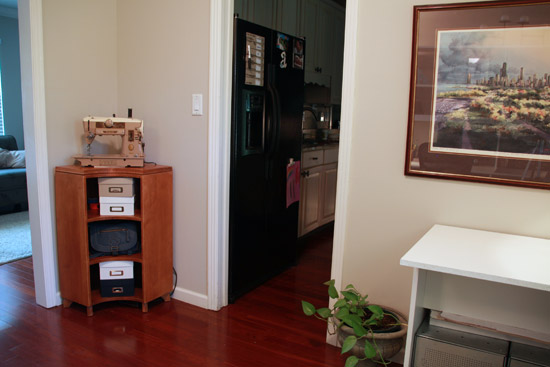
I'm thinking about painting this antique corner shelf, but can't decide on a color. Maybe a buttercream yellow? Or muted turqouise? I would leave it in the natural color, except I don't like how it looks next to the red hardwood floors. Maybe I could just paint the legs or the legs and the outside panels? I'm open to suggestions!
I'm not sure what (if anything) to put on the walls above it. Maybe some bare wall aren't so bad...
In any case, I'm calling the office "done" for now! And I love it. Maybe now I can get back to doing some work...instead of obsessively shopping for rugs and curtains.
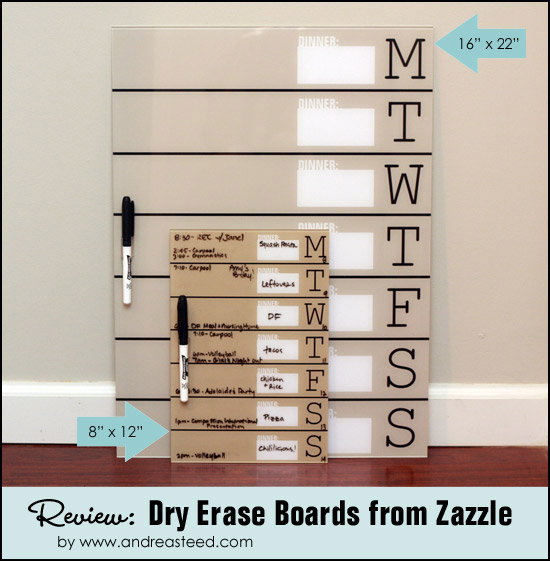
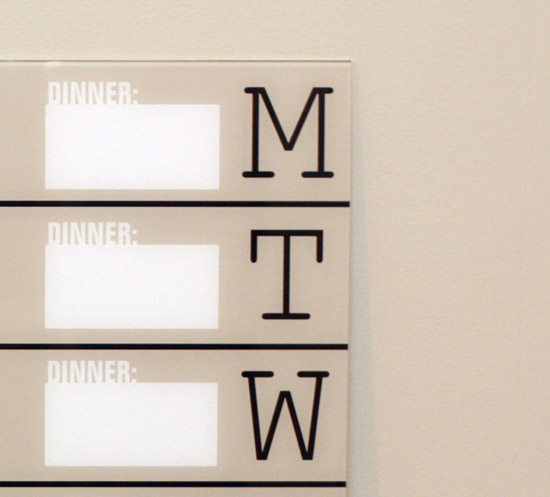
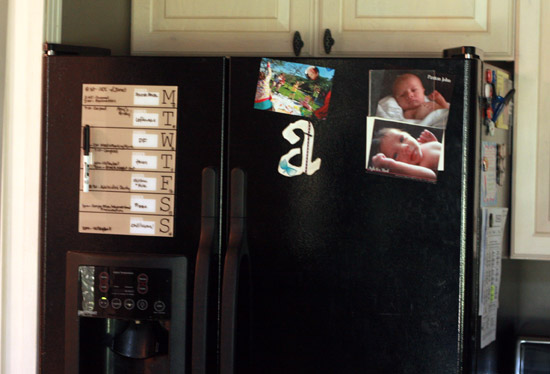
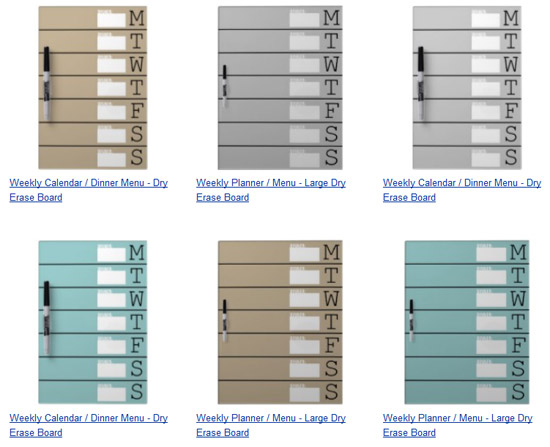
Weekly Schedule / Dinner Menu Dry Erase Board - Zazzle Review
 This year, it seems like our schedule has gotten much crazier with after school activities, church events, and family activities.
To try and keep track of it all -- and make the rest of the family aware of what's going on (instead of the calendar just being in MY head) -- I've been printing a weekly calendar on computer paper and writing in our activities for the week and pre-planning our dinner menus. Then I post it on the refrigerator, which is DEFINITELY the hub of our house. :)
Well, as I'm sure you know, plans and schedules change! So, I did a lot of scratching out, erasing, and rewriting the same things for the next week. But, aside from the scratch outs, the weekly calendar posted on the refrigerator was definitely working for us. Not only did I know exactly what needed to be done to prepare for dinner every day, but I could plan out meals based on the carpool and activity schedule, to make everything a little easier on us all. The system worked....I just needed a more permanent solution that looked nicer and was easier to adjust as our schedule and plans changed.
Enter -- a Dry Erase Board version of my weekly calendar! Zazzle.com intoduced dry erase boards as a new product not long ago, and I've been wanting to try them out.
I designed a basic weekly calendar onto two different sizes of dry erase boards (medium & large). I wasn't sure if the medium version (8" x 12") would be big enough to write all our activities on it, so I ordered both sizes to try them out. The large version is 16" x 22" and would be great for large families with lots going on every week!
Customization:
I ordered the medium sized version with the basic khaki background, but I got creative with the large one to try out some color matching with our new Sherwin William's paint swatch. I used the hexidecimal value number for our paint color (Worldly Gray #CEC8BB) and just pasted that into the background color. Viola - a perfectly matched piece of decor!
Here's how you do that...
How to Change the Background Color:
Click on the "customize it" button for the product.
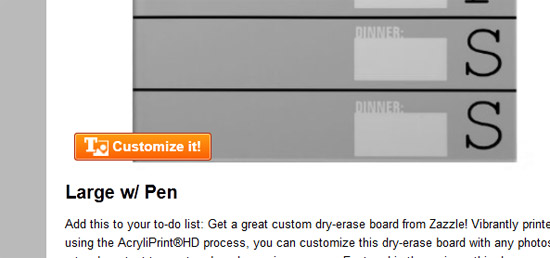
Click on "edit" and then "background color" from the drop-down menu.
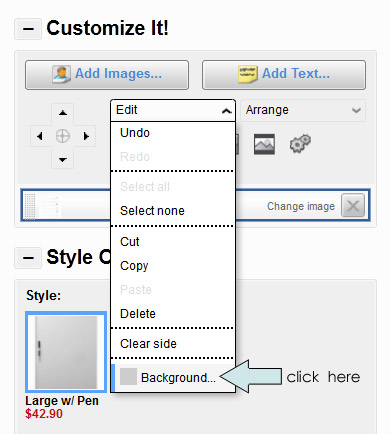
Next, choose a color from the color pallette or click on Advanced to enter your own hexidecimal number.
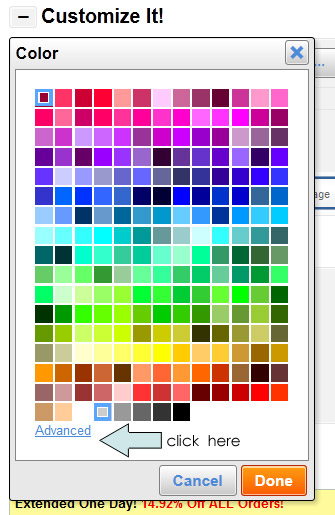
Enter the six digit hexidecimal number for your color of choice (which I found for my paint color at the Sherwin Williams web site).

As you can see, it's not exactly the same color as our walls, but it's pretty darn close! This would be such a cool way to perfectly integrate this dry erase board into your own decor.
Quality:
As far as the quality of Zazzle's dry erase boards, I was overall very pleased. The design printed all the way to the corners, and there is no border or frame added to the board. It comes with a black fine tip dry erase marker that clips right to the front of the board.
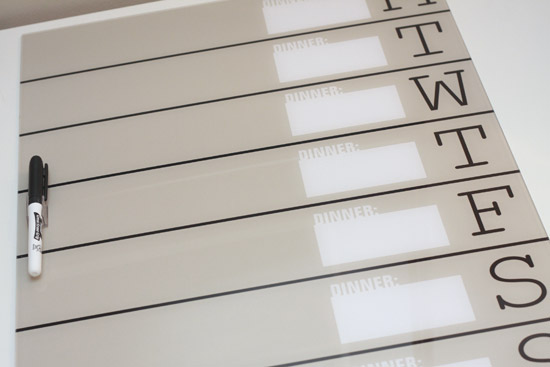
The slick finish on the top of the board makes it easy to write on (and easy to wipe off with a paper towel), which is exactly what I was looking for.
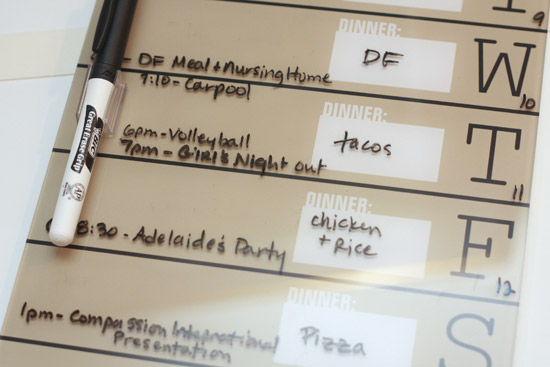
It's a pretty low-profile board, only about 3/16" thick.
Mounting Options:
My only disappointment was that the included "mounting equipment" was just double-stick foam tape in three strips on the back of the board.
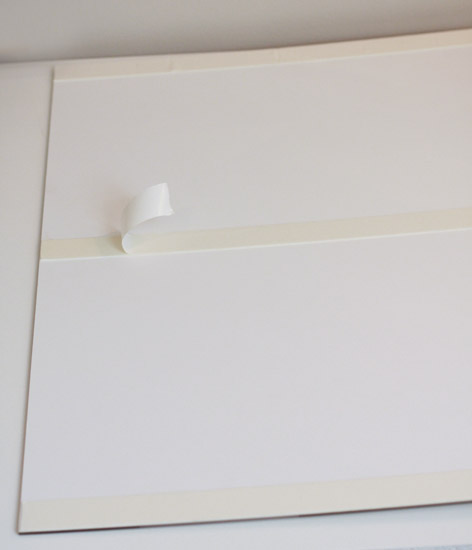
I'm sure they stick very well, but I'm *not* confident that they remove easily without ruining whatever it was stuck to, and wasn't about to stick it to my newly painted walls or refrigerator.
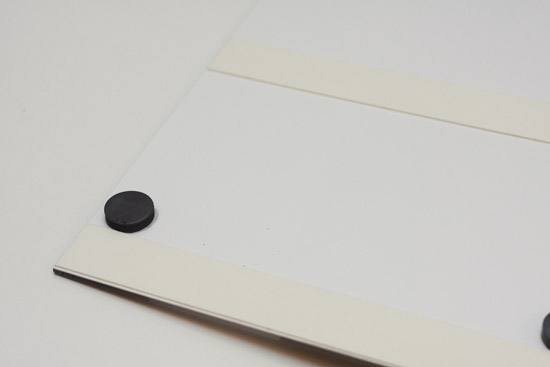
Instead, I glued four magnets to the back of the board so it would not-as-permanently stick to my refrigerator. :)
The 16" x 22" version would be pretty easy to put into an open-back frame (which you can have made at any framing shop). Or, you could use something like these if you wanted to mount it to a wall:

Size:
After trying out the different sizes for a few weeks, I decided that the medium version was a good size for our family's activities, and it fits nicely on our refrigerator without being too overwhelming.
Price:
At regular price, the large version of this (de)Sign is about $40 plus shipping and the medium version is only about $20 plus shipping. Plus, Zazzle offers coupons regularly, so this could really be an inexpensive family organization tool.
Conclusion:
I love it! I'm so happy with how my dry erase board has worked out. And now I can stop wasting printer paper on my weekly calendar scribbles. :)
- Would this calendar and dinner menu dry erase board be helpful in your house?
- What size would you get?
- Would you change the colors?
If you like this, you can buy it and customize your own here:
Or check out all of Zazzle's dry erase boards from tons of artists!