Kitchen Gallery Wall (Tutorial)
Feast your eyes upon my new gallery wall:

Remember this wall in our kitchen? About a year after we moved into this house, I added these four frames and "temporarily" filled them to look like this:
I liked it. It worked. And it stayed. Until one of those frames fell down and broke. Then it didn't work anymore, for obvious reasons.
A couple of weeks ago, I was beyond inspired by this post at a really cool home decor blog called YoungHouseLove.com.
"I can DO that!!!" (and it didn't hurt that there are about 100 frames floating around my house, so I didn't have to buy a single thing!
So, for the past several weeks, I've been semi-obsessed with getting this project done. Here's the process I took step-by-step:
First, I collected a ton of frames from around the house. Some were displayed, some were in the garage, but no frame was safe!

Next, I arranged them into a design on the floor in our kitchen, to get a general idea of how I wanted them to be layed out:

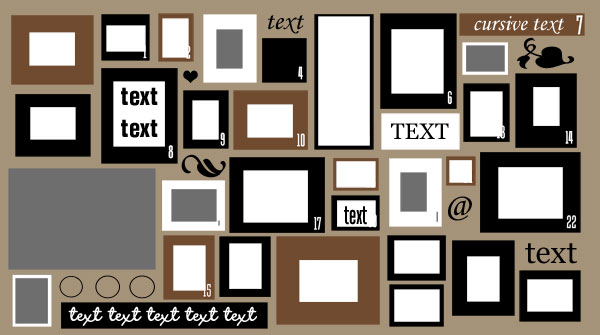
Since I couldn't pick up this whole grouping and eye-ball it against the wall, I decided to make a to-scale digital mockup of the whole collage so I could see how it would fit on the wall. I ended up with this:
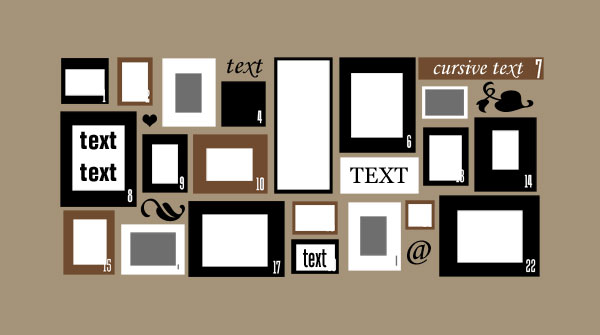
And decided it needed SO much more!!! So I scooted this grouping up to the top right corner and went searching for even more frames around the house, until I came up with this design, which I was much happier with:
Next, I cut newspapers to size to match up with each frame and taped it to the wall where I wanted the frame to hang. I even numbered them (and the frames themselves) to be sure I didn't confuse myself. Once those were up, I did a little more tweaking (especially in that lower left corner, which you can see is quite different than my digital mockup) until I was left with this:

I left that up a few days to try and decide whether I was going to like this new design in actuality or not. Until Ben said "Oh,just hang them up already. Commit." So I did.
HUGE tip -- With a paper template for each frame, I pulled each template down (one at a time), layed it across the back of the frame, marked where the hole in the wall should go, taped the paper back to the wall, and hammered in the nail. WORKS PERFECTLY every time! Then we had this lovely mis-match of frames on the wall:
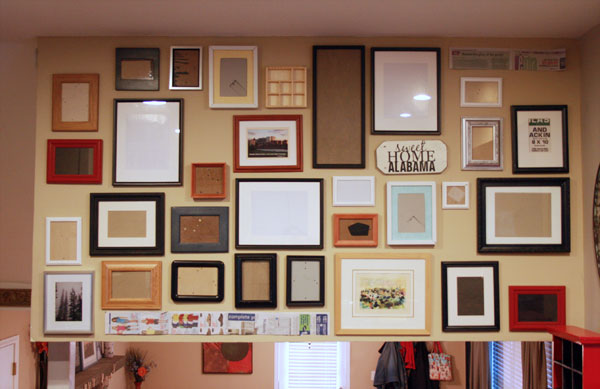
The night we left this up, it caught me off-guard every time I rounded the corner into the kitchen. I think maybe I was having some gallery-wall remorse. It reminded me a little more of a crowded old lady's house than the sleek and modern gallery wall I had envisioned.
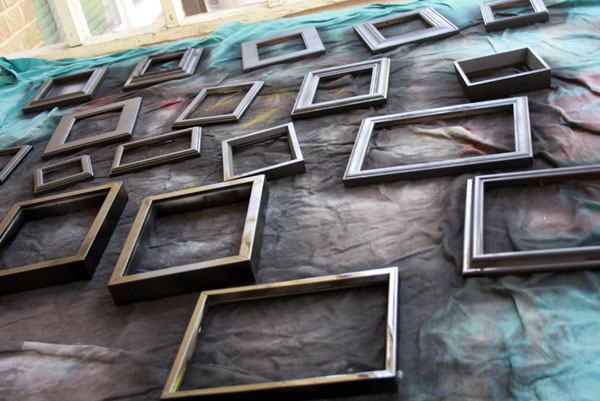
During this whole process I flip-flopped back and forth trying to decide whether to paint all the frames black, keep them their natural color, or do a combination of silver, wood, black and white. After seeing them on the wall...we quickly decided all-black was a must! Good thing I have lots of black spray paint on hand at all times!
Ahh...much better, eh?
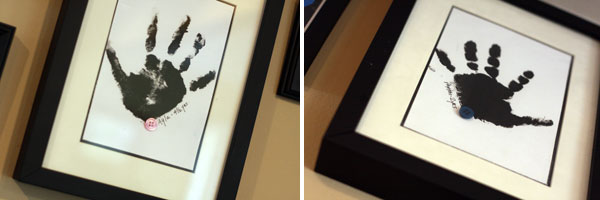
Then it was time to fill the frames with pictures & memorabilia and fill in the gaps with a few handmade projects. I started with these fun projects:


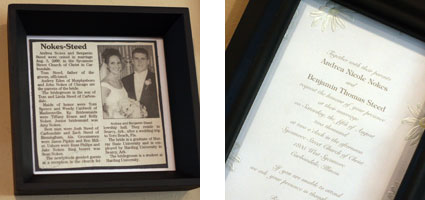
Then searched the house for a few meaningful memorabilia items:
- wedding announcement newspaper article
- decorative wedding certificate
- our wedding invitation (perhaps I should replace some of these with NON-wedding things..hmm)
And finally, I filled in with photos. Some of the kids, some of us, some of family and friends. I tried to pick photos that have special memories attached to them, rather than just picking my favorite portraits or photographs that I love (though a few of those creeped in too). Some of the special pictures included are:
- a picture of Ben & I at our high school graduation
- a photo of our sponsored Compassion International child from Ecuador
- newborn hospital photos of each of our kids
- Ben & I in our "Scrapjazz" shirts on a business trip (pre-children!)
- our home in Rochester, MN which was the first house we owned
I may change a few of these out occasionally, but I tried hard to pick timeless and sentimental pieces to tell the story of our family.
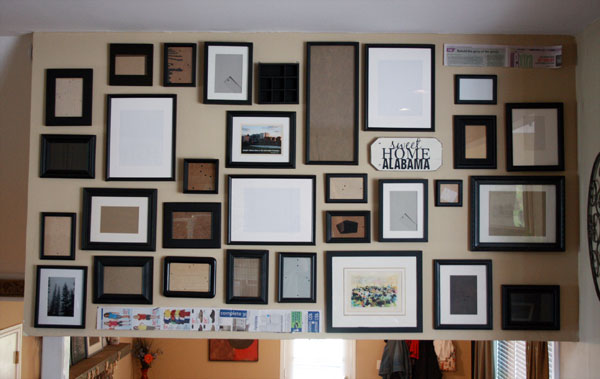
So here's the finished product (for now...I just can't call anything complete...I'm sure I'll find some fun knick-nacks to add to those empty spaces!):
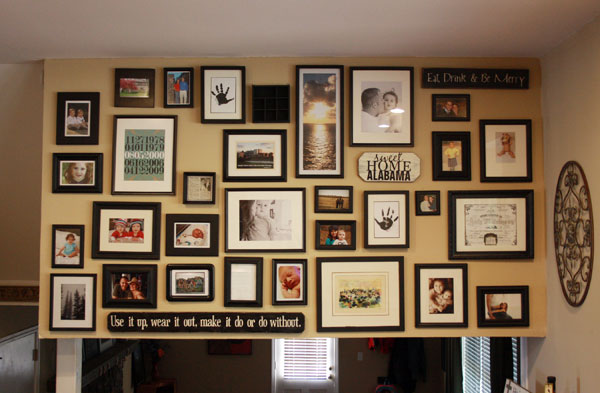
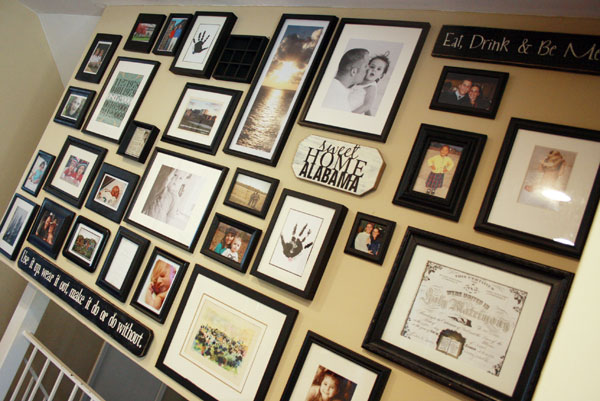
And here you can see some context with the rest of the kitchen/dining room:
Ahh...I love a finished project.


21 comments so far:
Gunilla said:
LOVE this tutorial, well done! I mentioned it on my blog and linked back to this tutorial!
Shirley Lupton said:
Oh how I love this gallery. I tried to save it but couldn't get it to save. Do you have any ideas?
Cara said:
I hope you don't mind but I added this project to my inspiration projects blog post. I did link back to you. If this a problem, please let me know and I will take it down immediately.
Thanks!
Cara
http://miscellaneousme.wordpress.com
Jennifer said:
This is definitely one of the BEST gallery walls I've seen on the blogs - just amazing. I'm in the process of putting some smaller-scale ones together in our home (my hubby is ready to get the garage back as its spread out with paint). What program did you use and how did you do that to-scale digital layout. My husband is a very, very visual person and he'd love to actually see it all up then say "yes or no" - this makes for very, very frustrating decorating on my part. So if I was able to do a digital to-scale mock-up, I think he'd LOVE it.
Cara said:
I LOVE this. Wonderful Job! I can't wait to copy it!
Cara
http://miscellaneousme.wordpress.com
Janet @ I HEART MY GLUE GUN said:
This looks so amazing! GREAT JOB!!!!
www.iheartmygluegun.com
Amy Kirchhoff said:
Love it! I've been playing with the idea of doing this same thing in our living room. We pretty much just have one or two "display" walls in our open-concept house...So I've got to make a lot out of a little. Do you think this could work on an even larger scale in the main area of a home? Or would it be too busy and cluttered? That's what I keep debating.
Kristin said:
That turned out great. I've been wanting to do something similar on the wall going up my stairs, and now that I see how you did it, I think I'm going to give it a try!
gramee said:
I wish I had stairs just so I could copy this Idea!!
I love the look on the stairway!
Meredith said:
I absolutely love the way you planned this out! I'm trying to gather courage to attempt a large-scale gallery wall. This was very helpful, and it looks awesome!
Alisha @ Felt So Cute said:
This is just incredible ~ I love it; the pictures, the choices your made, the typography - all terrific!
radhika said:
Love your art gallery wall. Love the frames with the kids hand print!
Katie @ Newcomb Home said:
I love it! Thank you for showing how much work it took to plan out, that's really helpful!
Stacy said:
Thank you for sharing your process with us! I love the all black frames--that changed the whole look of the wall and added some sophistication. Love it!
Chris said:
This turned out just perfectly! My girlfriend is currently trying to put together a gallery wall, and I'll be sending this to her for some inspiration. Love it!
Elizabeth Bailey said:
I LOVE IT ANDREA!!! Such a meaningful wall of photos and I loved seeing your process.
Elizabeth Bailey said:
I LOVE IT ANDREA!!! Such a meaningful wall of photos and I loved seeing your process.
Jesse said:
this looks GREAT ... i love it :)
Paige said:
Love it! I too saw that post from that blog YoungHouseLove......I need more walls!
~paige
Betsy said:
Wow, that looks like it was a lot of work! But I LOVE the finished product! I've been wanting to do a gallery wall for a long time, but after reading your post, I just don't know if I have the energy. :)
mariahcharles said:
LOVE IT!!!! Great job!!
Post new comment