Large T-Shirt to Fitted Tee Tutorial
I have these two t-shirts that I love. They're soft, comfortable, and have good worn (and sentimental) designs on them. But, I never wear them for anything other than around the house because they are large men's t-shirts and look completely shapeless on me. Then I found this great tutorial on YouTube for how to make a big t-shirt a fitted shirt! - T-Shirt Surgery: How to Make a Shirt Fit
So, while I was staying with my mom at her camper this summer (she lives & travels in an RV), I asked her to help me try it out. So yes...we broke out the sewing machine next to the campfire. Strange, I know, but it gave us a project to work on!
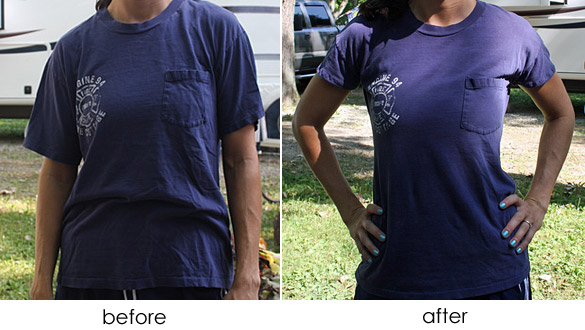
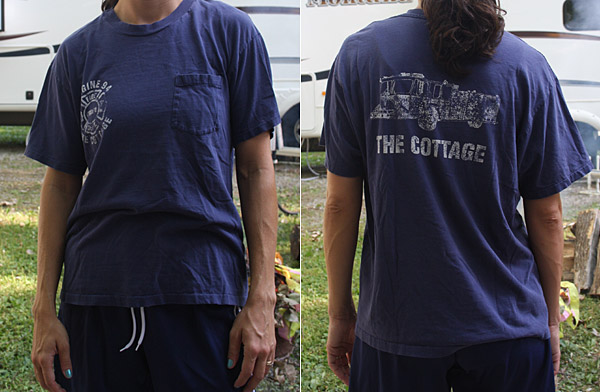
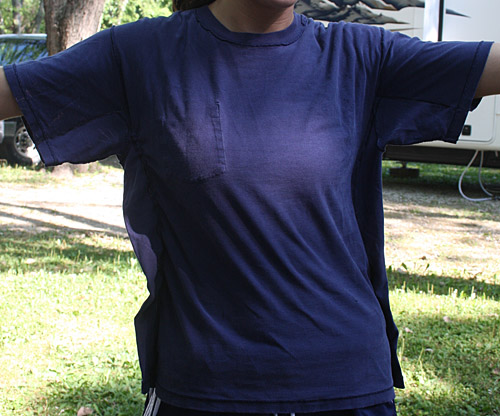
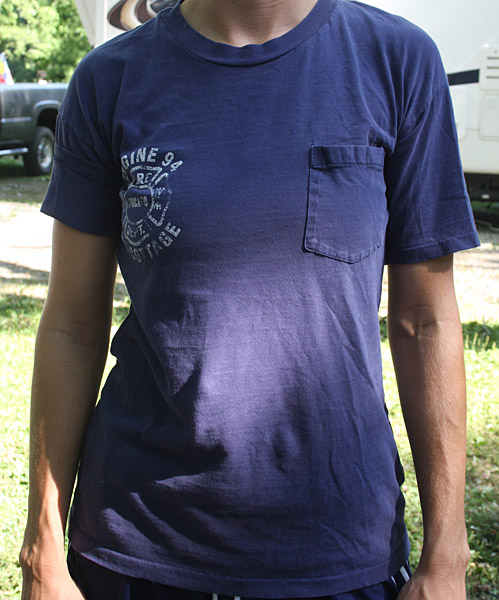
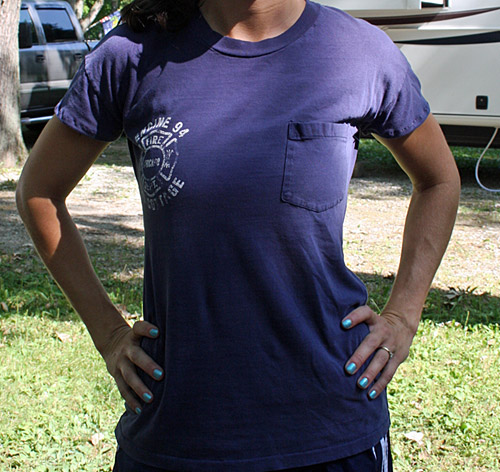
First, a before & after look at the t-shirt we did. Oh yeah, I know you love those electric blue fingernails. :)
So, here's how it's done.
-
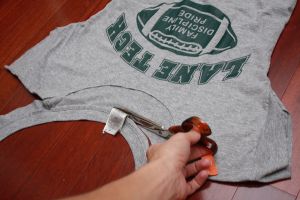
Start with a t-shirt you love that's just too big
-
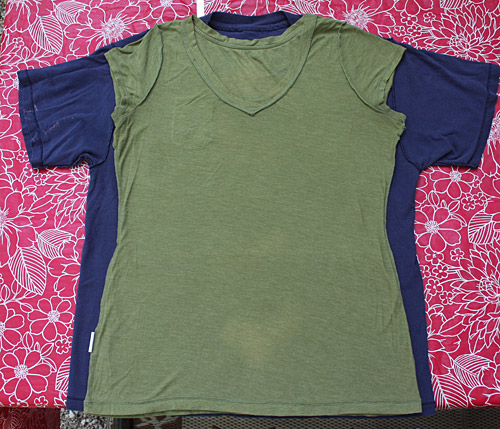
Turn the shirt inside out and lay a shirt that DOES fit you on top of it, lining up the collars so that you can be sure it is centered over your large t-shirt.
-
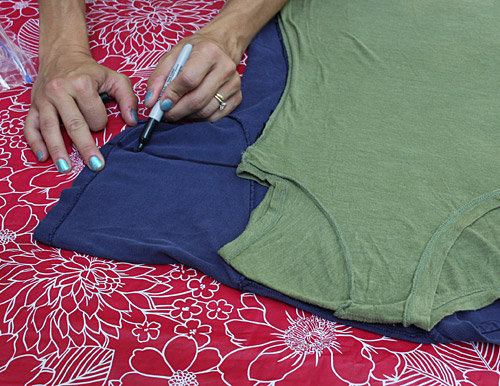
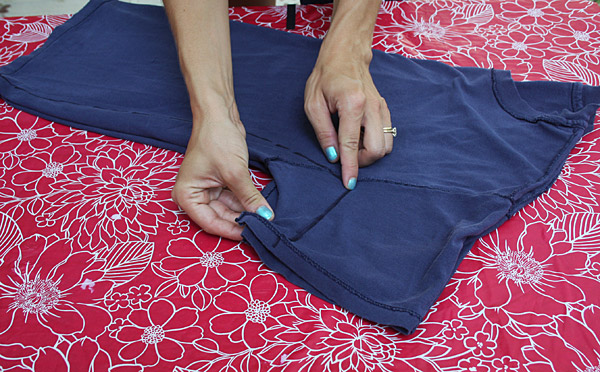
Trace the shirt that DOES fit you onto the large t-shirt. Turn both shirts inside out so that you don't mark on the front of the shirts. I used a sharpie, but you'd be better off to use a washable marker, chalk or a fabric pen. When you do the sleeves, try to make your line parallel to the top shoulder.
-
Next, fold the large t-shirt in half to make sure that the armpit marks line up. Mine did match up, but if yours don't, you can just re-mark them to match.
-
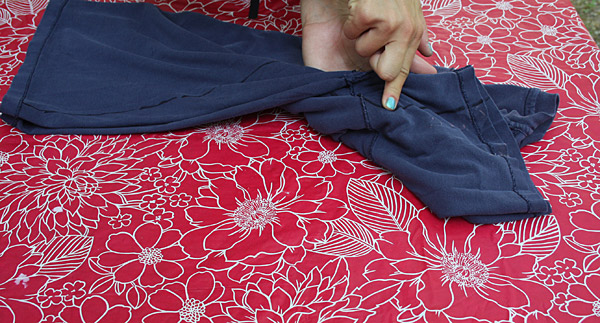
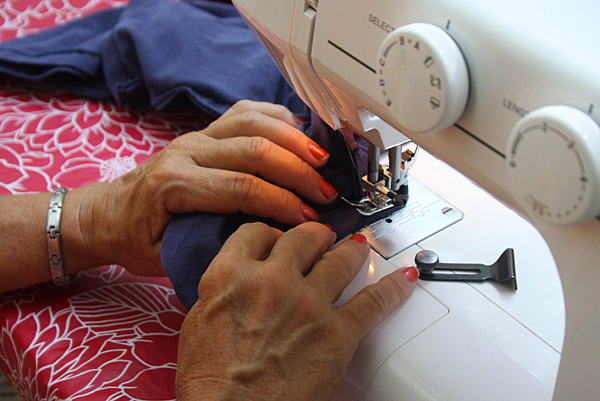
I went ahead and pinned the front and back of the shirt together, so that it didn't slip while we were sewing.
-
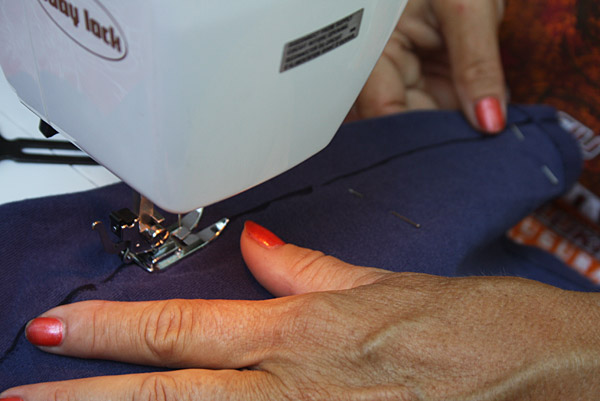
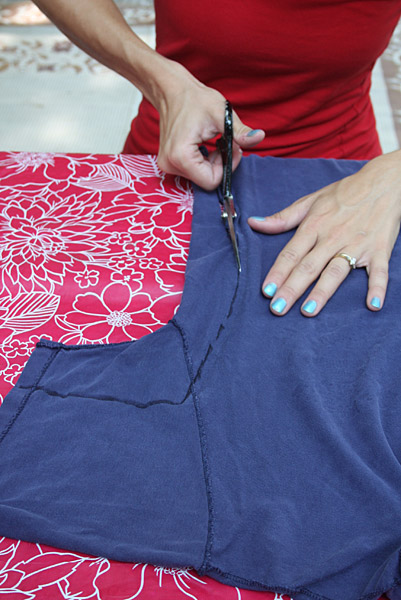
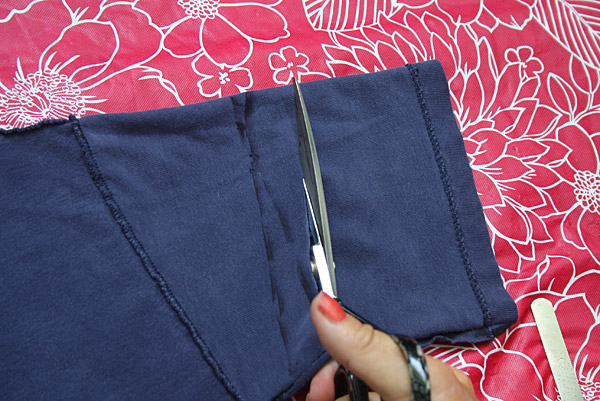
Sew along your traced lines. Or, in my case, have your MOM sew along the traced lines. :)
-
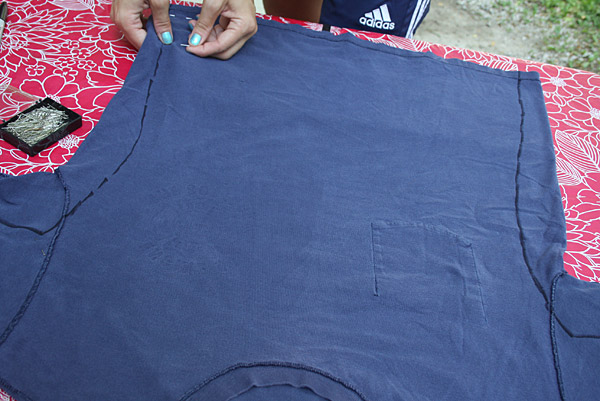
Try on your shirt (inside out) to see how it fits. Mine was still a little big, so we sewed it up again about a 1/4" more on each side. Then it looked like this:
-
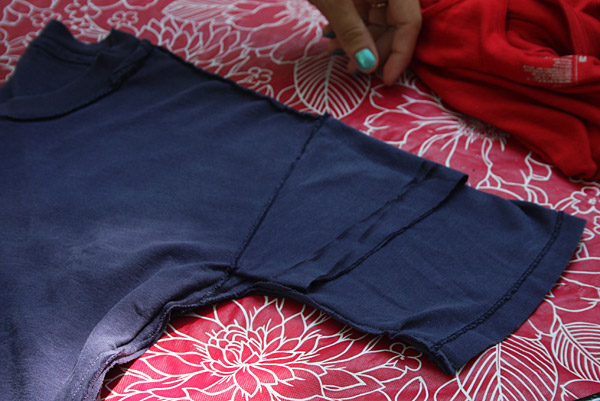
If you like the fit, then you can trim off the excess fabric.
-
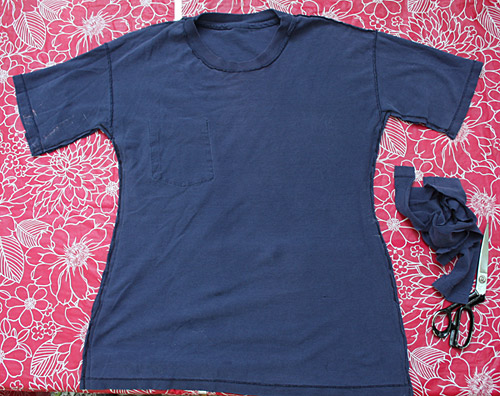
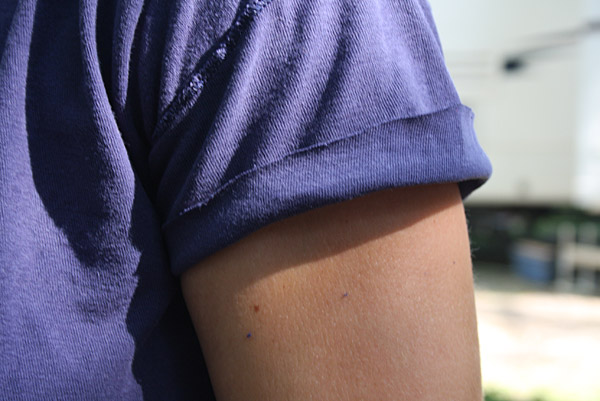
Turn the shirt right-side out and try it on. You can leave it as is, with longer sleeves, or you can cut & hem them - which is what I decided to do.
-
While I was wearing the shirt, I marked with a pin the length I wanted the sleeves to be. Then I took it off, turned it inside out again and drew a line. Okay, two lines, because I remembered that I wanted to angle the sleeve a little bit. Then I cut about 5/8" past the line (to allow for a hem).
Try it on and make sure it looks the way you want it to look.
-
Fold the shirt in half and cut the other sleeve to match.
-
Hem both sleeves.
-
You're done! Try it on & love the new look - preferably with cute jeans...not gym shorts and bright blue fingernails. :) But hey...we don't all do our crafting while looking our best, right?
Thanks to brianagayle for the video tutorial & tips! I'll be using this technique often I think. :)


146 comments so far:
Sandy said:
Great idea! But what do you do if the head opening is large and the shoulders hang? Am I just out of luck. By the way, I wear a ladies large and I’m trying to make an extra large fit. Thanks for any help.
Angela Judd said:
Thank you for this idea, I altered my Pilates shirt from large to medium and I’m so happy with the result. I will definitely be doing more of this. It was quick and easy.
Shirley said:
Thanks for the tutorial, I have a question. did you double fold the hem of the sleeve?
Alex said:
Brilliant idea. My girlfriend is CONSTANTLY complaining that shirts don't fit her ever since she got back from fat camp. I don't know why I never thought of this.
Christine said:
This is awesome. I am using it to make long t-shirts for my granddaughters to wear with leggings. So hard to find shirts to fit that is long enough to cover their behinds. This is just the way to fix them. Thanks a million.
Heather A said:
Your tutorial was fantastic! I've never been crafty and was able to successfully cut down a t-shirt. Now I won't look like I'm wearing my pjs in public ;) Thank you.
Rahul said:
Love the DIY idea. Have many shirts which need to be customised after I lost some weight.
nemysis said:
Thank you so much for sharing! :o)
I was looking for a t-shirt from my favorite movie, but couldn't find any my size on-line (and I didn't want a knock-off). I found an original in men's size large and used your tutorial. It fits and looks great! :o)
Jessica @ Polka Dotted All The Things said:
Great idea! I have several shirts that could use this tutorial!
Anonymous said:
Wow! I love this idea, I just packed up a box of t-shirts that I love, but due to weight loss are swimming in them. I'm going to try this idea!
Nakkase said:
Love this! good idea. :)
Skye said:
Hey! I love this tutorial! Im an Xs But theres this one shirt I REALLY like and they don't have my size. So this helped alot!!! :)
Gayle from Boston said:
Thanks Andrea! I have a Ramones T that my son in law gave me but it was too big, boxy and had a neckline that strangled me. I followed other instructions on how to modify the neck, which improved the look, but still too big and boxy. I followed your instructions to take in the sides and I shortened and angled the sleeves. It looks great! One comment, the T that I used for the pattern was a stretchier knit than the T I was sewing, so it was too tight, but I ripped out and added a few inches. Perfect!
Amber said:
This helps me so much! I just tried this on a shirt using different instructions and the sleeves got all wonky and the whole thing was ruined :/
kerry said:
Such a great tutorial! Looks like it wouldn't take up much time at all! Now if only I had a sewing machine!x
Anonymous said:
This is a great idea. I have been looking for things on how to take up clothing. I recently took up a pair of sweatpants with pockets. I searched u-tube and could never find what I wanted.I did not want to take them up on the side becouse when they get to big you also have a sagging crotch. So I took an old pair of capris that I had taken one side apart to make a pattern.I laid the up at the waist band and down the side where the pocket is. I then drew a line down the center through the crotch and down the leg. You do have to make sure you do the front and back seperate. So that the crotch fits right. Then I sewed them back together. They fit great.
Maggie said:
Just wondering how these feel worn since the seams are no longer serged. I'd be afraid they'd rub under arms and such.
Sarah Mc said:
they should be fine if you press the seam out. Your machine may have a faux serger stitch if you prefer that look or you can use a zig zag stitch to get a similar stitch.
Anonymous said:
Thanks so much for this post! I got to fix some of my overlarge shirts from my student orgs!
Debbie Gloom said:
This is exactly what I was looking for, thank you! I have a drawer full of big old style t shirts that I like the designs on but I can't stand non fitted shirts.
Jane L said:
Hahaha now I know exactly what I'm gonna do with all of my ex's favorite shirts that he didn't have time to take with him when I caught him cheating on me and changed my locks... Muahahaha. I hope he sees me around town in em. :)
Kam Kay said:
What a great idea! Never thought of making t-shirts look cool this way. Thanks for sharing!
Fashion Boutique said:
Wooow! This is fantastic idea I got via stumbleupon. Will start doing this project to old closet having many T-shirts loose now.
Thanks for sharing this creative post!
sewingmachine99 said:
Very creative. Thanks for posting.
Donna said:
I just finished my t-shirt. I love it! Thanks for great tutorial! I can't wait to wear my shirt to the basketball game tomorrow! My hysband just came home and said 'wow your shirt looks great!'.
Betty said:
Thank you, this tutorial is just what I was looking for.
Kelly said:
I am super busty and the shirts that fit me only do so because they stretch. Is there a way to compensate for that?
Diane said:
I have the same issue, large chest. You can sew the shirt from upper waist to bottom, taking in the excess material and giving you the shape you love. Baggy shirts make us look fat if our waist is not defined! Good luck!
Andreadh said:
I have the same issue. Nothing ever fits. My arms are also super short so in the winter I always end up rolling my sleeves by about 6 inches. I hate altering things ( I even hpave to shorten petite pants)
but this tutorial seem like it would be simple enough.
karisle said:
Thanks for your share. It is a great idea! I will try it!
Kat said:
I was so pleased to find your tutorial. I find it difficult to buy Tees with a good fit. I have a shorter waist and smaller thru the shoulders. If it fits through the bodice, the arm holes are too long and baggy, basically the garment from arm holes or bust up, is large and slides all over, and this is with shopping in petite sizing.
I have some nicer tees with cute necklines and trim, it would be so helpful to be able to make these alterations and have a better fit. I think your method just might work especially on my tees that have the shoulder seams in the right place. I would also like to know how to adjustment a shoulder seam so it will be at the top of the shoulder instead of too far over. I have noted that sometimes when I pull up an inch or so at the top of the shoulder which brings the arm holes up, it is a better fit. I can take a larger seam at the shoulder to achieve that, but I am clueless as to how to make the sleeve fit into a smaller arm holes. If you or anyone could direct me on that one, I would appreciate it. But until then I will try the method on your tutorial on some of my tees. Your tutorial was so well done and easy to follow. Your before and after pics were a huge contrast. You went from a big comfy tee to an adorable one. Much thanks to your Mom and you for collaborating over the campfire with this project and sharing with us.
GrammyPat said:
I understand your problems and it is easy to fix, though requiring a little more sewing. First lay the shirt flat and with a large piece of paper (or two or three pieces of printer paper taped together the long way), make a line at the top seam, around the arm skye, and down the side. Make a separate pattern for front and back, making sure to label them. Second, cut out the two patterns and cut off the sleeves close to the seam. The sleeve will have raw edges, the old sleeve seam is on the shirt. Third, lay your pattern on the shirt, line up the top seam and move it toward the neckline. I took one inch out of the shoulder to fit properly, so I moved the pattern a little less than an inch to allow for a 1/3 inch seam allowance. Mark both shirt and sleeve with a mark at shoulder seam to line up sleeve properly. Trace the new arm skye and side seams, allowing for a seam allowance. Do the same with the back pattern on the back of the shirt. Fourth, cut out new side and sleeve seams. You should now have a t-shirt sewn only at the shoulders and sleeves that have no seams. Lastly, place sleeves onto shirt, right sides together and sew. Then sew new side seams. Hint—do one side at a time so as to assure you are placing right sleeve to the right side. Trust me on this! I have altered T-shirts for an extremely fashion conscious great granddaughter and she loves the results.
cc said:
Thanks for posting this.
I just ordered some one size fits all nightshirts for my sister who is an extra small so the one size fits all tend to be too big for her; I sent her the nightshirts and the link to your tutorial since she's good at sewing when needed (but doesn't normally look for sewing projects). I would however add one footnote to your tutorial: remind people to mark where the design on the t-shirt is so that they don't accidentally cut it off when re-sizing the shirt.
Thanks again!
p.s. I enjoy photography so I love that t-shirt that has the camera and says 'I shoot people'. Too funny! :-)
Anonymous said:
One thing I noticed is you didn't say anything about allowing for seam allowances or if you did I missed it. I just saw where you cut along the line you drew which was right next to the shirt that fit except for the sleeves.
Anonymous said:
You don't cut along the lines so there is no need for seam allowance. You are tracing the shirt that fits and then sewing directly on that line, then trimming the excess away. Much easier and no need to account for a seam allowance. (Except on the sleeve.)
Anonymous said:
Hi. After I lost weight, I did basically the same thing to some of my tank tops, but I actually sewed the tops by hand... not as pretty, but effective. I was able to cut off 6 inches from each side (so a total of 24 inches all the way around).
My problem with doing this to the tops I would love to make fitted now (belonging to an 8 year old and an 11 year old) is that they have large graphics and it would ruin the designs. How do I get around that?
House Doctor said:
Very handy! great idea..
Woonaccessoires said:
Great idea! Saw your post on pinterest!
Jass Saini said:
Best tutorial I have ever seen. Nice Work. This tutorial Solved my problem. Thanks
Sybil said:
Thats a great advice on how to tweak your oversized shirt! I love it. Thanks alot.
Greets Sybil
Landelijke Woonaccessoires
Patty said:
Why didn't I think of this? I sew! I've lost 75lbs and have lots of t-shirts that are baggy but I don't want to just toss them and have to buy new ones. Now I don't have to! Thank you!
Linda said:
Thanks for helping save a desired T-shirt, and hopefully many more!
Anonymous said:
Thanks!!!!
Lauren Monsey Nagel said:
Wonderful article!!! thanks so much for making this easy.
Jen said:
LOVE this - I just saved a tee from 10 years ago that was bound for Goodwill. Thank you so much!
Charlotte said:
Thanks for sharing. Will try this for me and my daughters. I have skinny daughters that I can't buy for. If the length is correct then it is huge in the waist. Or too short and correct size. Wonder how this would work with sweatshirts?
Amy Carter said:
It's amazing how much shape the redesign of the shirt makes your figure stand out so much more! It seriously looks like a 40 year old and 20 year old difference in the picture. What a great idea. I love home solutions to things like this. Goes to show that it pays off to do some things yourself.
Kassie said:
I JUST got a sewing machine, do you recommend this for beginners?
Anonymous said:
This is a VERY easy project for a beginner! All you're doing is tracing lines and then sewing over them!
MK said:
Love this and can't wait to try this! I have broad shoulders so have to buy large shirts sometimes, but they swallow me. If it wasn't for my shoulders I'd be a small. And have a long torso. So shirts are hard to fit. Have some nice blood donation t-shirts that I don't wear because they are too big! And find some nice shirts I want at goodwill but are too big, so this might solve the problem! And my 8 year old has a long torso like me, but is tiny. So will put this to work for both of us! Thanks for the tip! And for those saying buy a new shirt...you can't always find a new shirt that is in your size and fits like you want. And what a great way to make those too big shirts that you just wear at night into day time shirts! And a great way to recycle or upcycle clothes!
Anonymous said:
Good job girl !! Very nice of you to share. This is something I've been doing for years (having 7 kids will force you to a lot of tricks).
As an additional note (maybe ?): If you have a serger, that really helps with finishing off the side seams, and a twin needle will give you an "unwavering" hem for the sleeves (you can use these on any home sewing machine).
Anonymous said:
I was just going to say the same thing. I work in an alterations shop and a serger is just what you need to be sure your seam stays together. If you have a cover-stitch machine for your hem or even a stretch stitch on your machine you'll get a smoother hem.
Also, make sure that any logo on the breast doesn't get pulled too far over... the one on the shirt shown is nearly under the armpit. If the shirt is super big, the neck will look too wide. But overall, this is an easy way to get more wear out of your t-shirts, and feel better while wearing them.
Christy, The Simple Homemaker said:
Terrific tutorial and great tip! I'm pinning this!
Jeannine said:
Love this. Thank you
Jennifer said:
I just worked my way down a size and was wondering what I was going to do with the L shirts I still love....hooray! Thanks!
Bonny said:
Thanks for a great tutorial. Like everyone else, I also have a few of those huge boxy shirts that I won't wear because they aren't flattering. I'm going to give this a try.
Momma Frans said:
This is fabulous!! My husband is a youth pastor, and I have so many big baggy t-shirts from different youth events. I will absolutely be doing this to about half my shirts ASAP. :-)
timetochill said:
thank you! i've always had problems with my too-big shirts and never wore them as often since they were too big. never again. :D
Claire said:
that's a great idea for all of the guy t-shirts i love that don't fit a woman & are too big
Smashinbeauty said:
Excellent idea :D
Shanaan said:
Great tutorial & so thrifty!! I hate to shop for clothes & I have recently lost quite a bit of weight so the the thought of having to go shopping is a nightmare for me! I'd much rather take up all my favorite shirts than go buy new ones :) !!
I also take up my button up blouses like this too. I press them out, wrong side out & sew 1/4" along the existing seams until the fit looks right. I've done 2 & so far they've turned out fine.
Anonymous said:
Just by one that fits. Why go through all that when you can buy your right size? Dos Muchos!!!
Anonymous said:
Because most t-shirts made for women (and all t-shirts made for men) DON'T fit women the way many of us want them to - if they are fitted through the bust and waist, they are too short in overall length. If they are long enough, they are too baggy. So, doing this may be a little extra work, but well worth it to have a t-shirt that is both long enough AND fits well!
Anonymous said:
Because it saves you money...Duh...
Anonymous said:
yeah!!! Thanks so much for this tutorial. I'm NOT a sewer. I don't even know why I own a machine. It took me about an hour to do the first shirt, after I figured out how to thread the machine, etc. Now I've done 6 shirts, including a peasant style with ruffles on top and on the sleeves, and a golf shirt. I've lost 70lbs since last summer, so this has saved me some money and the shirts look fantastic. Now I'm going to try to take in some cardigans. I can't wear them anyway, so if they don't turn out it's no big deal.
jeams1985 said:
Very like this style of Tees!
Robyn said:
Great ideas and detailed tutorial.
Anyone have ideas for how to turn the crew neck to a v-neck?
Amber said:
After looking at this I thought ok that looks easy enough. So after 3 hours of sewing unstitching and resewing I finally had it completed. It isn't easy if you ate just shortening the sleeve and moving the armpit up. I think if I was making the shirt not as wide it would have helped because there would have been a seem the entire way. It bunched up and looked terrible in the armpits. Anyway long story short it finally worked but it was a lot harder than it looked for a beginner.
Jessica said:
I don't know what kind of stitch you were using, but it might help to use a zigzag stitch with the knit fabric... that is, if you weren't doing that already. Knit can be tricky to work with and likes to bunch up a lot.
Whitney said:
I'm having the same problem! :( I am using a zigzag stretch and have tried three different stitch lengths - wide to very narrow and every time I turn it right side out, it's all bunched up, especially in the arm pits. Any other suggestions?
dylan said:
try this: hold the fabric in front of and behind the presser foot and pull very slightly as fabric runs under presser foot. Continue to reposition hands as necessary to maintain that slight pressure as you sew. Also use a ball tip needle when sewing knits. Problem solved.
Anonymous said:
That sounds like a tension problem to me. I'm not super experienced at sewing either so I can't remember if it's the top or bottom tension that you'd have to change but you might be able to Google it or look in the manual for your sewing machine which is where I learned about this.
Rachel said:
Love it! I have so many t-shirts that I love that fit me well back when I was 150 lb heavier and now when I try to wear them, well, they look like muumuus. But I don't want to throw them away! Definitely going to try to put my mom's sewing skills to use! Ha!
Rachel
turborachelfitness.com
Pati said:
CONGRATS on your AWESOME weight loss, Rachel !!! I need to lost about 40 lbs and I KNOW how VERY HARD it truly is !! Been there,done that...lost 45 last year ! Again, congrats !!! No matter HOW you did it I am sure it wasn't easy. ;o)
Smile said:
Very interesting info!Perfect just what I was looking for!
Karyn said:
Had I found this a couple years ago, I could have made myself so much happier in all those baggy teeshirts I had to wear for work! They only came in the unisex style, and because I'm big-chested (but not big anywhere else), they never fit right!
I can't wait to go to town on the shirts I have left!
jb said:
Fantastic tips. Its given me some ideas. Will sort that wardrobe!
Mannee Nixon said:
Great Tips, thanks i have so many unfit t-shirt. so now its look better thanks..
Anonymous said:
Great idea.. I have a T-Shirt.. My husband's first gift its little bigger to me.. Ill sew it.. Thanks for posting..
Beth said:
Wow! Thank you for the simple, clear instructions. A half hour after seeing this I dug out my sewing machine ( I pretend to sew) and I changed a boxy style souvenir shirt into one that I will actually wear!
anonymous t shirts said:
Greetings! Very helpful advice within this post!
It's the little changes that will make the biggest changes.
Thanks a lot for sharing!
LazySusan said:
Great idea. Never thought to use a fitted shirt as a pattern. So smart. Hate the unisex sizes because of bagginess. This is a perfect solution. Thank you very much for the smart tip.
Anonymous said:
I think this is great! I have heaps of large t shirts that could work out well :) thank you
JsTim-Nva said:
just for fun...lol
Anonymous said:
Beyond Stupid!! Who has this much time??
Pati said:
What a MEAN comment on a very HANDY tutorial !! I LOVE to sew and I have lost weight as well and have some sentimental shirts my family has given me over the years that I will use this in order to be able to wear them !
If you have no use for information such this,why did you read the tutorial then make an ugly comment ?? You OBVIOUSLY have enough time to be ugly. If I were you, I would use my time more constructively. ;o) Such as telling folks how to sew their tshirts to make them form fitting. GRIN ;o))))
Anonymous said:
um...obviously you do, not only did your read this, you replied, so I am thinking if you have the time for that you have time to sew up a quick t shirt.
Anonymous said:
What a mean comment. This doesn't take that much time....and it's surely cheaper than buying a bunch of new shirts if you have lost a bunch of weight. Please keep your mean comments to yourself.
Anonymous said:
Hmm, did you take the time to come here and look at the tutorial? And then take the time to comment? Just sayin' ...
Anonymous said:
i love this...i am a newis sewer, and now, your making it sooo easy!! and reading this and all the comments, i can only imagin all the wives who have a favorite shirt of their hubbies that will undoubtedly now no longer fit said hubby anymore...myseriously of course lol....hehehe...thank you so much!!! :D
sammysam said:
I LOVE this! Thank you for posting the detailed and easy instructions. I did this in about 30 minutes and love the result.
KellyJean Gettelfinger said:
SO AWESOME!!! THANK YOU THANK YOU THANK YOU!!! I've been wanting to try something like this but just didn't know how to get started. Now... off to call my momma... he he he
Vicky said:
Wow - how simple, thank you so much for that
- it will be tried out :-)
Anonymous said:
Thank you! I'm a support worker for people with disabilities so I wear a lot of tshirts from Goodwill to work. Usually mens, and always too big in some way!!! Thanks :)
Anonymous said:
I wish I could do this for some jeans.. or pants in general. Haha..
:) said:
THANK YOU SO MUCH FOR THIS!!!
I am really short and small, so big t-shirts are always waay too long and wide and hemming them up to make it shorter looks awkward as well because it's short and wide lol but now I can actually make my shirts look good! :) and it's so simple!
Blogging Runner said:
This is such a great idea! Thanks for all the pictures, I have to get to work.
R.Steed! said:
So I got to this page from pinterest .... and whoa you have the same last name as me?!?! No one ever has the same last name as me! Oh.. and yes i've tried this and it totally works.. i left the sleeves longer and it looks kinda like a baseball shirt :)
Anonymous said:
how cool. amazing how much more flattering the fitted shirt is!
LisaO said:
Love it! I pinned this months ago and finally got around to trying it today. I fixed 4 shirts already. SWEET!
ATasteOfMadness said:
Wow, what a great idea! I have SO many oversized t-shirts. I love them, don't get me wrong, but it's good to know that I have options :)
katrina said:
I love this !!!! I Hope you dont mind but I linked this page to my inspiration for my own attempt at this ! I just started sewing and the idea of using a already perfectly fitting shirt was awesome. Here I was trying to pin it all over me and there you go telling me an easy way. I wore my shirt proudly today and told everyone that would care to listen haha
Laura said:
What kind of stitch did you use?
Andrea said:
Just a regular straight stitch.
MOCK! said:
Some anonymous poster wrote:
What?!? Who writes that? Why would...? Maybe it is a pose? Maybe it's the angle?
It reminds me of the Jim Gaffigan routine "I just wanted to make you self conscious for the rest of your life."
Perhaps it was well meaning, but it comes off really weird.
Rinn said:
Well that's stupid. You can clearly see that it's just the way her hair is sitting on her shoulder, and the lighting is different on one side of her. That person might have been trying to help, but they failed.
Rachel said:
Maybe her hair and her shoulders are misshapen, too. j/k
Jacqueline said:
This is a fantastic tutorial! Thanks so much for sharing!!!
Mom Prepares said:
Thanks for this great post! We loved your tutorial so much that we featured it over at Mom Prepares! http://momprepares.com/2012/05/17/nine-free-and-awesome-sewing-tutorials...
meredith said:
amazing - thanks - seem so simple - why didn't I think of that.
thank you - I will try this weekend
Anne said:
Andrea-
Your mom and my sister (Joan T.) are friends. Joan told me about this project and we are going to give it a try. I HATE how ill-fitting men's T-shirts are! Can't wait to try this out!
Anonymous said:
This is great, however the thing I hate worst about men's t shirts are the collars. Do you have instructions on how to make the collars more feminine?
Anonymous said:
This might help you out! http://www.craftster.org/forum/index.php?topic=349525.0
Jillian @ Hi! It's Jilly said:
This. is. AWESOME! I definitely have to try it!! "Pinning" it right now!
Anonymous said:
Great idea, def. gonna try this!
Crali said:
Holy moley, this is EXCELLENT!!
rebecca said:
This is a great idea and it's great to see so many people enthused by it. Another easy way to fit a garment is to put it on inside out and get someone to pinch and pin the seams until it's snug and then the sew along this line. I've done this with both t-shirts, but also a dress which I bought from a charity shop and was 4 sizes too large. It's now one of the best fitting dresses I have!
Another way I've seen to do it is to sew darts into your t-shirt. A girl I went to school with had her mum do this to her school polo shirt.
Vedette said:
Omg, thank you so much for this!. I did this a while ago but to my dismay, it was a bit too snug. But hey, now I know what to do on my other shirts. Now I can wear my old favorite shirts again.
Anonymous said:
That is Great to know! Thanks! I have tons of t-shirts that need this make-over :) on a side note...i noticed one of your shoulders is way higher than the other. I recently had this problem and someone told me to visit the chiropracter. It took about 3 visits. He first took x-rays and then he straightened me up! It was amazing...i didn't even know i felt that bad until after. Just a suggestion :)
jenn said:
thanks so much! did this to a tee this morning!
http://www.flickr.com/photos/impromptukiss/7018014433/in/photostream/
Brea Gayle said:
:) Thanks for the credit! It's exciting to see my video pop up in so many places, my friend sent me a link to this! I'm glad I could help, and I'm glad you made a photo tutorial!
Jaime Kiser said:
I tried this awhile ago just the way you did and it came out WAY too tight around the arms and chest. Any suggestions?
Totalcornflakes said:
Another suggestion, baste the shirt on the lines (big hand stitching that you can easily remove) to test the fit before you commit to the sewing machine.
Dana said:
Once you make sure it's centered by matching up the neckline, you may want to slide the shirt you're using as a pattern down just a tad. Perhaps the remade shirt was too tight in the chest and arms because it was too high up for where your curves are? Just a suggestion!
Silver said:
Wonderful advice, thanks heaps for sharing it! I can't wait to try this next time I unearth something fab but too big - for me or my daughters :)
Angela @ farragio said:
LOVE this idea! I have so many t-shirts I never wear because they don't have a flattering shape. Can't wait to give this a try!
janeowens said:
great idea as son has lost weight we need to alter his ts
LISBETH said:
ME ENCANTOO SIGAN PUBLICANDO COSAS FACILES
Patricia Streeter said:
Thank you posting this! I love to sew and have plenty of big shirts that are too big for me. I am getting ready to clean out my closet to make room for new garments. You may have saved some big t's from being evicted from my dresser!
Dbakeca - Annunci personali tutta Italia said:
Looks pretty easy to made...I liked this post.
Anonymous said:
How to make Tee Shirt fit.
Vasim Khan said:
Nice Post.. Thank you very much for such a wonderful tip..
Laurel said:
Saw this on Pintrest and just tried it with my daughter's shirt. It worked! And it's forgiving of errors, too. Even my 11 year old could do it with help. I love anything that I don't have to be exact on. Thank you!
Keepin'Home w/ Judy said:
LOVE this! Thanks so much for sharing! I will be trying it out hopefully today!!!
Anonymous said:
Love this article```
Anonymous said:
Love this! My husband passed away a little over a year ago and I love to wear his tshirts but just around the house because they are so big. Now, I am going to give this a try and I can't wait!
Thans said:
Haha thanks for this :)
Lee said:
I love this post!! I found it on pinterest and I was inspired. I have taken a T-shirt that fit the body but had those funky long man sleeves, and I modified the sleeves. I don't know why it never occurred to me to actually fix the shirts overall! I get about 5 new T-shirts a year from schools I work with and I never know what to do with them... now I do, thank you so much.
As a side note, when I did fix the sleeves, I got nervous about the hem on the arm and instead of cutting it at the bottom, I sort of folded the middle portion of the sleeve up and just tacked the fold along the hem at the top and sewed it. I liked the way it looked because it maintained the original factory hem but it was sort of clugy work. I will have to give this a try, thanks so much
Liz said:
Do you think that this would work for a crew neck sweatshirt?
Zoe said:
Nice idea how to wear old lovely, but big t-shirts. And with your pics it looks so easy. Thank you!
Samm said:
This is so great! It will help me save half the tees I was about to get rid of. Do you have any advice on tie shirts?
Lauren said:
this will save about half of the shirts in my closet, thanks!!
Lauren said:
this will save about half of the shirts in my closet, thanks!!
becca said:
Hey So I am in love with this..... I just learned to sew so this is an awesome project for me!! I found on Pintrest but I also blog so I would love a follow back if interested Jeanobsession.blogspot.com
Have a great day becca
Laura Ingalls Gunn said:
What an adorable DIY project! Thank you so much for sharing.
Happy Monday!
Anonymous said:
OMG!! Thanks a lot, Andrea!! Now I will be doing this for a TON of Audrey's t-shirts!! OK, maybe a few of mine as well. You amaze me with your beastly skills!!
Post new comment